| When Helen and I were building Oaracle,
our Jim Michalak designed Frolic2
in late 2003 and early 2004, we discussed getting
a carbon fiber mast to save weight and make it easier
to raise and strike that spar. But when we priced
one, we got sticker shock – it would cost as
much as the plywood, fiberglass, and epoxy for the
hull of our 20-foot boat. Or about $900 for the 17-foot
mast.
We put that idea away and lived with the wooden mast,
which cost less than a tenth as much to build.
But the idea continued to nag, helped by references
here and there. I read about Gary Lepak using old
windsurfer masts for his
boats, putting one inside the other when
he needed more strength and rigidity. The problem
with that is those of sufficient length for Oaracle
seem to be two-piece, which means there’s no
way to stick one inside the other.
Bateau.com
sells a kit for making carbon fiber spars and they
had one that would fit Oaracle, but it was for a stayed
spar and Oaracle’s plans are for an unstayed
mast to go with its balanced lug sail. I tried, but
couldn’t get the information on what it would
take to beef the mast up for our needs. But from that
site I learned about carbon and fiberglass sleeving;
flexible, tubular fabrics that could be laminated
over a core to produce a composite mast. But the basic
materials didn’t seem to be available except
in kits.
The final piece was discovering the website of Soller
Composites, www.sollercomposites.com.
Available from this source are fabric sleeves in different
diameters and different materials – fiberglass,
carbon fiber, kevlar, and combinations of the three.
Owner Jon Soller also proved helpful when I had e-mail
questions and is sympathetic and understanding of
the needs of the backyard boat tinkerer.
The final nudge was reading one of Jim
Michalak’s essays. Oaracle is built
to his Frolic2
plans. As designed its mast is built from Douglas
fir, square in section, and 3 inches thick at the
base and partners, tapering to about and inch and
a half at the mast head. Michalak wrote somewhere
(I can’t put my finger on it at the moment)
that as designed the mast might be stiffer than necessary.
That means when on the wind and a gust hits the boat,
the force is translated either into forward speed
– or increased heeling. With two people, Oaracle
is very stable, even in breezy conditions as long
as you’re smart enough to reef down. Michalak
has published stability tables and the Frolic2 design
is impressive with two crew. With only one, it’s
a bit more iffy, and I do a fair amount of single
handing on Oaracle. A more flexible mast adds a safety
margin in higher winds.
Now all I had to do was find a suitable, discarded
windsurfer mast that could be beefed up with sleeving.
That proved difficult. I checked a local windsurfing
club and one about 150 miles away in Jacksonville,
but either got no replies to my e-mails or assurances
there were no old masts lying around. Finally I lucked
into a business in Panama City that was reducing its
stock of rental windsurfers and gear. I managed to
get a two-piece 18-foot mast that was broken just
above the joint, a 15 foot carbon/fiberglass one piece
mast and a used sail; the latter two acquired in case
they prove useful on some future project. Total cost:
$70 of which $10 was for the 18-foot mast. Biaxial
carbon sleeving and fiberglass sleeving was ordered
from Soller Composites and Evan Reynolds, a friend
who was interested in carbon fiber (in his case as
a way to make lightweight motorcycle parts) volunteered
to help.
| 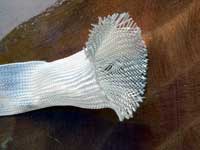 This
is a piece of 2-inch fiberglass sleeving; the
biaxial carbon looks like this but its black.
The carbon biaxial I used was 7.5 ounce/square
yard, and is also available in heavier weaves.
The fiberglass sleeve is 10 ounce cloth. The
unidirectional sleeving I got is 15.5 ounces/square
yard (if I read the chart right) and if anything
felt even heavier, perhaps as all the fibers
were running in one direction. As the picture
suggests, the sleeving expands and contracts
to cover a wide range of diameters. The 2-inch
carbon biaxial sleeving, for example, will expand
to cover up to about 2.25-inch tube, and stretch
out to cover on down to about .75 inches. (A
good thing, since my mast tapers to about an
inch at the top.) The 2-inch unidirectional
is a bit more limited, fitting tube from 2.5
inches to 1 inch in diameter. (Source: Soller
Composites). This
is a piece of 2-inch fiberglass sleeving; the
biaxial carbon looks like this but its black.
The carbon biaxial I used was 7.5 ounce/square
yard, and is also available in heavier weaves.
The fiberglass sleeve is 10 ounce cloth. The
unidirectional sleeving I got is 15.5 ounces/square
yard (if I read the chart right) and if anything
felt even heavier, perhaps as all the fibers
were running in one direction. As the picture
suggests, the sleeving expands and contracts
to cover a wide range of diameters. The 2-inch
carbon biaxial sleeving, for example, will expand
to cover up to about 2.25-inch tube, and stretch
out to cover on down to about .75 inches. (A
good thing, since my mast tapers to about an
inch at the top.) The 2-inch unidirectional
is a bit more limited, fitting tube from 2.5
inches to 1 inch in diameter. (Source: Soller
Composites).
|
First, a cautionary tale about epoxy and carbon
fiber. I typically use an inexpensive, thick 1:1 epoxy
for my boat projects. It’s great for gluing
and laminates fiberglass well when applied with a
plastic spreader. If I’m only coating the wood,
I thin the epoxy, usually with acetone because otherwise
it puts on a much thicker than necessary layer, and
really uses up the epoxy. About the only draw back
is if applied on a vertical surface, say filling the
weave of fiberglass cloth, its thickness causes it
to run, adding a lot of work to the finish.
I initially used this epoxy and three layers of
biaxial sleeving of staggered lengths to repair the
break in the two-piece carbon fiber mast, which had
been cut down to 17 feet.. But after several days
of curing, the carbon was flexible. The mast parts
could move under the patch and it was easy to feel
the ends of the break moving inside. It was sanded
off so the patch could be redone.
Lesson learned: Use thin epoxies with carbon fiber
(Jon Soller recommends WEST). In the course of this
mast project, I used standard WEST epoxy, MAS 2:1
epoxy, and the economy 2:1 epoxy sold by Duckworks.
All are thin epoxies (noticeably much thinner than
the original stuff I used) and all worked well with
the carbon fiber.
Back to repairing the mast. I decided to take a
different approach to repairing the break. Following
a request to buy a sample of a “regular”
carbon fabric, Jon Soller sold us a square yard scrap
of carbon that had the look and weight of heavy regular
fiberglass woven roving, but with a much stiffer feel
– if you bend it, it almost snaps back to flat.
A piece was cut out to cover and generously overlap
the break. Even wet out, this heavy carbon fiber was
too stiff to stay stuck to the mast, so it was wrapped
first in plastic and then with clear packing tape
– sort of a poor man’s vacuum bagging.
When the epoxy (WEST in this case) cured, there was
no question the mast was fixed. There was no noticeable
bend in the repair. Two more staggered layers of the
biaxial sleeving were added over the repair, to spread
the load and avoid hard spots where the heavy carbon
layer ended. (The repair gave the mast a slight python-that-swallowed-the-pig
look just above the midsection, if you look closely.)
The repairs also overlapped the joint of the mast,
turning it from two-piece into a one-piece, which
I preferred anyway.
The repairs were sanded smooth and the next step
was fairly straightforward. The entire mast was covered
with two layers of biaxial sleeving, added one at
a time, and allowed to cure between layers. A extra
layer was added to the top half of the mast for extra
stiffness there, and also at the partners.
A note about applying epoxy to the sleeving. The
best way is to brush some epoxy on the carbon fiber
and then use a gloved hand as a squeegee to work the
epoxy in and spread it. It’s much harder to
tell when carbon is saturated than fiberglass. The
glass will turn clear when its properly wet out; the
carbon stays black. I found that if the carbon looked
a bit dry, it probably needed some more epoxy. Keep
using your hands to squeegee the resin to get an even
wet out without excess epoxy. And wear vinyl or rubber
gloves, latex will tear or wear through, even on smooth
fabric.
Also, make sure to sand the spar smooth between
layers to eliminate any snags or fine fibers that
stick up. (Wear a good dusk mask, carbon fiber dust
is very unhealthy.) If there’s any thing to
catch the next layer of sleeving, it will be all but
impossible to feed the sleeving on the mast and certainly
impossible to avoid snags in the fabric.
At this point, the mast seemed plenty strong enough,
but still pretty bendy. The overall weight was probably
doubled or better, but it was still a fraction of
the wooden mast. An inquiry on the Duckworks online
discussion forum produced advice that strands of carbon
fiber tow (ribbons about 1/4-inch wide) could be run
the length of the mast for improved stiffness. The
tow was available cheaply on eBay, so I gave that
a try, but a dozen or so strands, run the length of
the mast didn’t produce any appreciable increase
in stiffness. However, the mast was no longer perfectly
round. I decided to add the final cover layer of fiberglass
sleeving and give it a test.
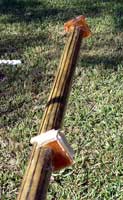 |
The lower part
of the mast with the epoxy-cast foot and partners
spacers to fit what was originally built into
the boat for the wooden mast. The black stripes
are the carbon tow that was added to improve
stiffness – a wasted effort from what
I could tell. |
First with Oaracle’s bow on the beach, the
halyard (led to the masthead) was used to pull the
boat over to its beam ends. The rationale was if the
mast was strong enough to pull the boat over, it wouldn’t
break under a full press of sail in a knockdown breeze.
It passed with no problems.
Next was a sail test on a one-reef, breezy day.
The mast was noticeably more bendy than its wooden
counterpart (not surprising since test on land showed
it was much more flexible). It seemed to perform well,
except hard on the wind on the good tack (when the
balanced lug is leeward of the mast) when the sail
seemed to stall. It may have been the bend in the
mast was just enough to change the sail shape. On
the bad tack (the sail against the mast) that didn’t
seem to be a problem, but my impression was the mast
bent less on that tack. Another sail on a moderate
wind day (no reef needed) seemed to produce good all
around performance. It seemed like I had a good mast
for light to moderate winds, but one I didn’t
feel comfortable with for stronger breezes.
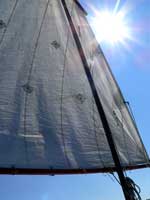 |
The interim
mast, before the unidirectional sleeving was
applied, in a fresh breeze. The bend of the
mast is evident. This also shows the bend in
the boom that the downhaul imposes, a took for
controlling sail shape on a balanced lug. |
I put the mast aside to ponder for a while, in the
meantime taking the safe and certain wooden mast for
the 2007 WaterTribe Everglades Challenge. About that
time, I noted that Soller Composites had begun selling
a sleeving of unidirectional carbon fiber, and in
the right diameter for the composite mast. It looked
a great deal heavier than the biaxial sleeving and
Jon Soller confirmed that it was both heavier and
should add quite a bit of stiffness to the mast. It
was also considerably more expensive. After some more
cogitation, and some advice from Helen (“do
it!”), I ordered the unidirectional sleeving,
and some more fiberglass sleeving. Since breathing
carbon fiber dust when sanding is hazardous, I preferred
to finish the mast with a layer of fiberglass so I
wouldn’t have to worry so much (yes, I was wearing
a dust mask) when sanding the mast to fair it and
prep it for painting.
When the unidirectional sleeving arrived, I was
impressed. The strands were much heavier than the
carbon tow I had tried, more like the strands in heavy
fiberglass woven roving. In fact, they were close
to the size of the strands in the fabric I had used
to repair the break in the mast. The strands were
held in alignment by stretchy threads of spandex.
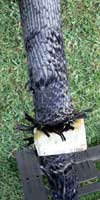 |
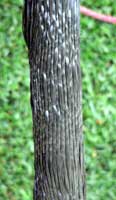
Closeup of the
unidirectional sleeving on the mast. It was
butted up against the foot and partner block
to try to avoid any hard spot there. |
 |
The mast was sanded to remove any snags and unfairness
– but it still took quite a bit of work to feed
the unidirectional sleeving on the no-longer-perfectly-round
mast. It took noticeably more epoxy to wet out than
the biaxial sleeving, but when it was all done and
set, the mast had achieved significantly increased
stiffness. Still not as rigid as the wooden mast,
but much better than it had been. I think it’s
about what I aimed for – more flexible in gusts
to reduce the heeling forces, but stiff enough to
keep a good sail shape in a fresh breeze. Equally
important, I have no qualms about its strength. The
final layer of fiberglass sleeving finished the laminating,
and it was painted white to reduce the heat absorbed
by black carbon fiber in the Florida summer sun.
 |
The carbon mast
with the unidirectional sleeving added (but
before the final fiberglass layer). On the left
is the original wooden mast. |
It’s a much heavier mast than when it started,
possibly three to four times as much. But it’s
still only about half the weight of the wooden mast
– possibly a weight savings of 15 to 20 pounds
(one of these days we’ll get a scale and I can
stop guessing about these things). There are three
immediate benefits. One, the overall boat is lighter
by that much – not an insignificant consideration
when the boat must be beach launched as in the Everglades
Challenge and perhaps hauled off mud flats in Florida
Bay. Secondly stepping or taking down the mast is
an order of magnitude easier – a not inconsiderate
improvement when doing it afloat in choppy water.
The last advantage has to do with the mast shape.
The beaded parrel specified by Michalak to hold the
yard to the mast slides effortlessly up and down the
round carbon mast. Sometimes it had the tendency to
bind slightly on the square wooden mast and it was
never as easy to hoist as on the carbon spar. That’s
a comforting feeling on a dark night and rising wind
with the prospect of reefing becoming more likely.
 |
The finished
and painted carbon mast test fitted on Oaracle.
The sailing trials will have to wait awhile. |
 |
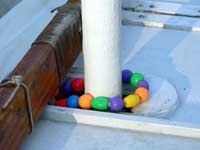
| The yard parrel
fits easily around the round mast and has less
friction than the square-sectioned wood mast. |
|
A note about the mast step and partners. Those are
sized for the wooden mast, which is three inches square
on the lower section. The carbon mast started as a
two-inch diameter round spar. Even with the multiple
layers added, it’s probably only about 2 1/4-inches
or less. The step and partners could have been reworked
to fit the skinnier mast, but that would have precluded
using the wooden mast again. I decided to “cast”
a step and partners on the carbon mast to fit what
was already on the boat. The step was lined with plastic,
and the partners were thoroughly waxed and the bottom
and open side sealed with tape. Then the step and
partners were filled with thickened epoxy and scraps
of fiberglass. The partners proved imperfectly sealed
and leaked a bit; fortunately I had a drop cloth around
the base to catch the mess. If I were doing it again,
I’d make wooden blocks to fit the step and partners,
and then use a hole saw to drill holes to match the
mast’s rake (some folks might be able to free
hand that; I’d need a drill press). Then the
blocks could be glued to the mast at the proper locations.
With the benefit of this experience, if I were doing
it again I’d change the layup schedule for this
mast. After repairing the break (now I’d use
the unidirectional and a couple layers of the biaxial
sleeving), I’d start with the undirectional
sleeving, and follow it with a layer of the biaxial.
Then I’d test it and expect this would have
almost the same stiffness as my finished mast. If
satisfied, the final layer of fiberglass would go
on. Probably this would come out about five pounds
or more lighter than my finished mast. I think about
a quart of epoxy or less would be enough for all three
layers, possibly with some left over. My version probably
used about a half gallon.
I got my broken spar for $10, and spent about $300
for materials to repair and strengthen it. That cost
would be reduced to around $200 with the revised layup
that I think is strong enough. That’s a third
to a quarter of the price I was quoted in 2004 for
a custom made carbon fiber mast, although I’m
sure the custom mast would have been as stiff or stiffer
and somewhat lighter as well. For me, that’s
past the point of diminishing returns and not worth
the extra cost.
But then again, even with scrounging for a used
mast, the carbon spar cost three to four times what
the original wooden one – built out of high
grade Douglas fir – did. For me, it’s
seems worth it as the boat will be easier to set up,
and raising, reefing, and striking the sail will be
easier.
As Oaracle and I respectively are both undergoing
some routine maintenance and upgrades, it will be
a while before I get to extensively wring out the
new mast. I’ll try to provide a short update
report then. But I’m confident the carbon spar
will be the mast of choice from now on. I also think
this has an application for other small boats. We
used to have a 20-foot v-bottom catboat daysailer,
designed by Phil Bolger. It’s perhaps the best
handling and most fun to sail small boat I’ve
ever had, but it was a major pain to set up. As originally
designed, the solid wooden mast ( just over 18 feet
long) had to be stood up vertically and then dropped
through the deck partners and into the step (which
of course, couldn’t be seen). It was both tricky
and exhausting (to be fair, the boat was designed
to be left in the water most of the time). It was
eventually replaced with an aluminum tube mast (17
feet long), set in an above deck tabernacle, but it
was still slightly dicey raising and lowering it and
I once almost dropped it on Helen. A carbon fiber
spar would have relieved most of the worst problem
for using this boat. However, since it carried about
25 percent more sail than Oaracle, I would have beefed
up the spar, probably using two instead of one layer
of the unidirectional sleeving and maybe a second
biaxial layer as well.
In the for-what-it’s-worth department, I suspect
the original unmodified 18-foot spar carried a sail
nearly as large as Oaracle’s 113-square foot
lug. But the strains are different with a lug sail
than with a windsurfer sail that has a highly curved
luff. Obviously some strengthening was needed because
the mast had already broken once. But I’d guess
– and this is a guess as I’m not a carbon
fiber expert – that most of what was added went
for stiffness and there’s a great deal of redundant
strength in this mast. For boats with smaller sails,
using unmodified (and unbroken!) cast off windsurfer
masts would probably work well. And several innovators
have adapted windsurfer masts and sails to their home-built
boats; I’m thinking about trying my used sail
and extra mast on our Michalak Piccup
pram..
It’s also possible to use a wooden spar as
the core for carbon fiber. Graham Byrnes, on his winning
design for the 2007 Everglades Challenge, needed lightweight
unstayed masts that could be easily raised and lowered.
He used aluminum for the lower sections of his masts
(if memory serves) but the top several feet were wooden
birdsmouth sections, and covered with carbon fiber
to produce a combination of strength and light weight.
They performed well for him.
If you’re looking for a light mast that’s
no longer than a windsurfer spar and are willing to
spend more than for a wooden mast (but not as much
as for a factory-made spar), this is one alternative
to consider.

Other articles by Gary Blankenship &
Helen Snell:

|