Sealing the Mast
by Gary Blankenship & Helen Snell
A revamping of our 30-foot Bolger-designed lugger a few years ago included a change from a conventional keel-stepped mast to a folding mast mounted in a tabernacle. It’s a nice improvement that does away with the need for a crane to lower the mast.
|
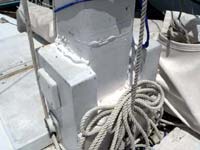
Aft side of the mast and tabernacle |
 |
|
But as with most gains on a sailboat, there was also a compromise. It was much harder to come up with an effective mast boot to keep rainwater out of the boat. Difficulties include: a) a gap of an inch or more between the aft side of the mast and the backside of the tabernacle; b) on the forward side there is a removable hatch that butts up to the forward side of the mast (removing the hatch allows the mast to swing up and down through the cabin top); c) the “seam” where the tabernacle and mast join on the top and front; d) and four cleats and the halyard cheek block mounted on the tabernacle where a normal mast boot would be installed.
|
Closeup of the aft side, showing the hardened and painted foam, which overflowed the gap between the mast and aft tabernacle wall |
|
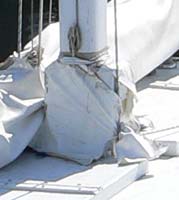
A vinyl fabric boot, using shock cord and caulk and with some funny looking cutouts to accommodate the cleats and cheek block actually worked fairly well, but it looked terrible and needed frequent adjustments to maintain its water tightness. It was also vulnerable to abrasion from the boom of the balanced lug, which wore against it.
|
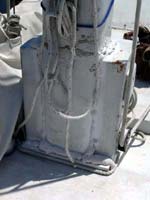
Forward side of the mast and tabernacle, showing the forward hatch that butts up against the mast and tabernacle |
 |
|
A solution was suggested during a recent home improvement project, where we used expanding spray insulating foam, available at hardwares and home improvement stores. The can advertised that the foam could be used indoors or out, was waterproof, paintable, and flexible. A light bulb went on! This seemed like a good way to seal around the mast without the hassle and unsightliness of the vinyl boot.
The thought is that the foam would easily be cut or scraped away in a couple minutes if the mast has to come down, and has little if any adhesive power if the mast has to come down in a hurry without time to cut. The residue could easily be scraped or sanded off.
|
Closeup of the forward side where the hatch butts up to the mast and tabernacle. Notice there's no boot to interfere with the halyard running through the cheek block |
|
The initial application took only a couple minutes. Unfortunately, I had to leave shortly after the spraying. The foam continues to expand for 15-30 minutes and someone told us it was best to trim it after an hour or two, before it is fully hardened. Alas, I wasn’t there so it bulges a bit from the seams, a bit like someone with an overlarge caulk gun got carried away. But once painted, it’s not that noticeable, and certainly much better looking than the fabric boot. The only mild problem in installation is the inch or so gap between the aft side of the mast and the tabernacle was too large for the foam to initially fill. I stuffed some plastic grocery bags into the gap to make a floor, and had no problem after that.
The foam has now been through the 2-3 inches of rain brought by Tropical Storm Arlene and the foot of rain dropped by Hurricane Dennis (as well as the tropical storm force winds it brought to our area), and some brisk sails. It hasn’t leaked a drop.
|
The old fabric boot was difficult to keep in place and didn't look neat |
 |
|
This might work on conventional keel-stepped masts as long as the spar is held rigidly in place at the partners with wedges.
It seems like nearly an ideal solution for cases like ours: it only takes a couple minutes to do and only costs a buck or two in materials.

