 Custom Search
|
|
| sails |
| plans |
| epoxy |
| rope/line |
| hardware |
| canoe/Kayak |
| sailmaking |
| materials |
| models |
| media |
| tools |
| gear |
 |
 |
| join |
| home |
| indexes |
| classifieds |
| calendar |
| archives |
| about |
| links |
| Join Duckworks Get free newsletter Comment on articles CLICK HERE |
|
|
| Gamaray, a Mayfly 14, Does the Texas200 - Pt 1 |
by Chuck Pierce - Beaumont, Texas - USA |
Michalak Mayfly: Part 1 - The Build It all really started when Chuck Leinweber changed the route for the 2011 Texas200. Oh, I had been thinking for some time about building a boat. I wanted something under 14 feet so that there were no registration fees (in Texas, there are no registration requirements for non-motor powered boats under 14 feet). Hopefully it could fit in the back of my Toyota Tacoma extended cab pickup (no trailer tags to pay for either!). My other boats, a Boston Whaler Harpoon 5.2 and a West Wight Potter 19, both take 40 minutes to an hour to rig and launch. This means that they tend not to be used unless we can sail all day or overnight. If we had something that I could rig and put in the water in 15 minutes, I could go sail for an hour or two in an afternoon with the grandkids and not spend more time setting up and taking down the rig than we did sailing. A big requirement was that the design be a quick build. I am a longtime woodworker and have a shop full of tools that have seen lots of use in the restoration of our 80 year old house. Because of the time spent on the restoration and upkeep of said house, I have always tried to keep a certain amount of time set aside for sailing and the restoration of ME that sailing facilitates. I did not want to give away too much of that time for a build, so I wanted a design that could be built in 8 or 9 weekends. After consultations with some helpful folks on the Duckworks Yahoo forum and a couple of emails to Jim Michalak, the plans for Jim's Mayfly 14 were ordered from Duckworks in the late summer. My brother in law and I had completed the 2009 and 2010 Texas200's in my Potter 19, Aldebaran. When Chuck posted the revised route for 2011, I saw that the P19 would probably be the wrong boat to take. The biggest problem I saw was that it would take 4 or 5 people to push a 1600 pound boat with 300 pounds of supplies, tools, and spares in it off a grounding in the back bays. We could be stuck for a while if no one else was around and we grounded. That would be inconvenient. If we were grounded on an oyster reef, it would chew up the hull and give me yet another nice long project to work on in the months after the event, and that was to be avoided altogether. The other thing was that even though Aldebaran is a great boat for the high winds and bay chop typically encountered on the 200, she will not sail to windward in less than about 3 feet of water. After some reflection, I decided that there was no way for us to do the new route in the P19. At this point, I had made no decision that I would actually go in the Mayfly, but I figured that since I was planning on building it anyway, I might as well try to finish it by March or April. That way, I could do the testing and tweaking that I knew it would take to get the boat (and myself) ready for the trip. I had until mid-May to make the decision. Through the fall and winter I gradually turned the workshop into a boatshop. Aquatek plywood was purchased and I cleaned out the woodrack to make room for dimensional lumber so that I could buy and store clear pieces as I found them. The build began the second weekend of February. I started by ripping some 12 foot pine 2x6's for the boom and mast, which needed to be hollow - both for weight and so that they would hopefully help prevent a turtle in the event of a capsize. The mast was octagonal so that it would not twist in the partner, and it tapered as the plans specified. The boom was made the same way but without the taper, and the sides were trimmed down to make the cross section an octagon with unequal sides (I have no idea of the correct name for this shape) so that: 1. The boom would be very stiff for the loose footed sail I planned to build and; 2. With a couple of small wedges it would fit the partner and step for use as an emergency mast. That weekend I made the sail as well, out of 5 oz. polytarp.
The following weekend I set up a couple of sawhorses, screwed 10 foot 2x4's to them, then braced and leveled the resulting frame. I wanted a good worktable to loft and cut plywood and build forms on, and I thought that it would be easier to put the boat together if I got it up off the floor. By the end of the 2nd weekend the forms, transom, stem, and bulkheads were made, and the sides lofted and cut out. We were in good shape to go 3D the next weekend.
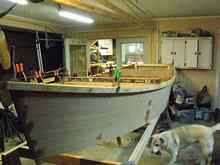
On Saturday morning a buddy of mine came over and we screwed and epoxied the temporary forms and bulkheads to the sides then installed the stem and transom, making sure that everything was level and square as we went. Within a couple of hours, we had a boat! Well, instead of the pile of wood we started with we had something that at least LOOKED sort of like a boat. I spent that afternoon epoxying over the stainless screwheads and ripping the wales. Sunday the gunwales went on and that Monday evening after work another friend came by and we turned her over.
I started Weekend 4 by ripping the chine logs and installing them. I laid the ½" plywood that would become the bottom up on the boat and did a rough panel layout, then cut out the panels with a jigsaw, being careful to cut about 1/8" outside the lines. After attaching each of the three panels, the sander with some 60 grit paper quickly got them flush to the chine logs and rounded over. The temporary forms were removed and I glassed the seams and chine logs and let the epoxy set up hard overnight. At this point, the shape of the hull was locked in. I decided the next day to take the boat off the stand, turn it over, and put it on my shop cart so that I could easily move it around. This was a mistake. I was alone and with the bottom on, the previously lightweight hull weighed close to 200 pounds. In my excitement at hitting another milestone I ignored the little voice that said, "Wait until you can get some help" and went into full-blown Knucklehead Mode. I positioned the shop cart at the bow and went around to the stern, picked it up (thinking, "wow, this seems heavier than it used to be") and slid the bow onto the shop cart, which started rolling as I pushed the boat forward. I moved forward until I reached the rear crossbar, then set the stern down on the stand, crawled underneath it, lifted the stern and started forward again. When I reached the front crossbar, I set the stern on the stand again, and this time crawled completely under the hull on my hands and knees, picked it up again, and rolled it forward so that it was clear of the stand. This is when the trouble started. Picture, if you will, the upside down boat, which has a fair amount of rocker, perched on the rolling shop cart supported only by the tip of the internal stem and with the heaviest part of the boat far above the balance point. Once the stern was off the stand the hull started to act like an upside down fully ballasted keelboat in heavy seas, that is to say, it wanted to roll upright. It wanted to roll upright REAL bad. On my knees underneath the hull, it was all I could do to hold it in place. I couldn't stand and I couldn't set it down (I was underneath the thing, for goodness' sake). Then to add to my worries, Sadie (our half Lab half Golden Hair Machine and Sailing Dog) decided to see if she could be of some assistance and crawled under there with me and lay down. I was starting to panic a little, and yelled at Sadie to get out of there. She gave me a dirty look as if to say, "Hey, I just thought you needed some help, Bub" and went off and sat down about ten feet away. She watched intently and seemed to be really curious as to how I was going to pull this off without her. I finally was able to slowly work my way toward the bow while trying not to let the cart roll any further forward and I inched the stern down little by little. Once I felt the transom make contact with the concrete behind me I knew I was out of the woods. Flat on my belly I crawled slowly out, rolled over, and lay there panting while Sadie came over and licked my face a couple of times to make sure that I was ok. Mind you, I still had to actually turn the boat over and get it on the cart but as it turned out that was the easiest part of the whole ordeal! After it was done and the boat was secured, I needed a break, so I climbed up into our new boat for the first time and relaxed. Sadie immediately went nuts wanting in, so I lifted her up there too, at which point she promptly and completely forgave me for my earlier slight. That evening I dug out some old unused syringes (sans needles) and started mixing epoxy for the interior fillets where the sides meet the bottom. The syringes worked very well at putting the wood flour-thickened epoxy where it needed to be. By the end of the day the inside of the boat was ready for paint.
The next 3 weekends were taken up with a business trip and out of town family stuff, and no boat work was done. By the first weekend in April I was chomping at the bit and ready to get back to boatbuilding. It was a productive weekend. The decks were cut out and painted on their undersides, and the storage compartments were painted. After the paint dried, the decks were epoxied on; the leeboard and rudder were cut out, laminated, and faired, and most importantly the waterproof hatches were made. The hatches are the key to using the Mayfly as an expedition boat. As Jim designed them they are large enough for things like sleeping bags and tents to be put through them and it is easy to get stuff in and out of the storage compartments because of their size. I changed the design a bit because I knew the importance on a long trip of the storage compartments staying absolutely dry even during a capsize. Rather than the bungeed on lid spec'd in the plans, I built full hatches with weather
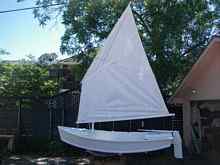
Weekend 6. I thought I was still pretty much on schedule, but there was so much left to do that nagging doubts were starting to paralyze my middle-aged brain. I worked 12 hours that Saturday rather than my normal 8 or 9. This paid off - I got the upper and lower leeboard guards and the mast step and partner all built and installed in a single day. These are some pieces that really have to be just about perfect for the boat to sail well, so I took my time and fiddled with them all until I was satisfied. The next day after church I took a smooth 8" finish roller and put a coat of Glidden Poly Porch and Floor on everything that I could. The cockpit, leeboard and rudder, decks, spars, and the entire hull except for the chine logs and bottom got a coat of paint. I quit early - there was nothing more I could do. That week I cheated a bit by going out to the shop every evening for an hour or so and lightly sanding everything and then rolling another coat of paint on. I may be a Knucklehead at times, but I am a Knucklehead who learns from some of his mistakes. I had a couple of strong friends come by the next Saturday and help me turn the boat yet again so that the bottom could be painted. While the paint set up I started installing hardware on the spars and cutting lines to length. I put the cleats, blocks, etc. where I thought they needed to go and screwed them down tight. I did not want to use any of the 3M 5200 adhesive/sealant that I had until I was able to sail her a few times and make sure that nothing needed to be moved. Anyone who knows me understands that I am not the neatest person in terms of my shop. I tend to let things go a bit during a project until it gets to the point where I can't find stuff. That was starting to happen, so Sunday I took a day off (except for applying another coat of paint) and cleaned up the shop. Tools were put away, the floors were swept, and trash cans were emptied. That week I cheated again and put 4 more coats of paint on the bottom for a total of 6. On Friday evening we turned the boat upright for the final time. Cleats, gudgeons, u-bolts into each of the bulkheads (for tying stuff to) and the oarlocks got mounted the next day. Then I threaded parrels onto the halyard and spent the rest of the weekend doing all of the little things that have to be done to make a mostly complete boat sailable. On April 29th I tied the sail and halyard onto the yard and raised the sail for the first time. I had just a couple of weeks to make a decision.
To be continued next month... |


