 Custom Search
|
|
| |
| sails |
| plans |
| epoxy |
| rope/line |
| hardware |
| canoe/Kayak |
| sailmaking |
| materials |
| models |
| media |
| tools |
| gear |
 |
 |
| join |
| home |
| indexes |
| classifieds |
| calendar |
| archives |
| about |
| links |
| Join Duckworks Get free newsletter Comment on articles CLICK HERE |
|
|
| Building the First Barton Skiff |
By Brian King - Pembroke, Wales - UK |
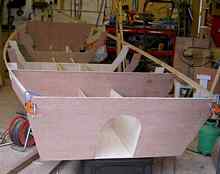
Background My house is on a Welsh creek, and I wanted a boat to explore the local, sheltered National Park and Milford Haven waterways. I chose Gavin Atkin's design, The Barton Skiff, because it would make best use of my existing, 3.5 horsepower, outboard engine. I am an experienced woodworker, but this was my first home-built boat. I built it in a single-car, garage, which also houses lots of tools and garden machinery. The skiff is 15 ft 4 inches long, but it fits in corner to corner! The Build I decided to save a little weight, and money, by using 9mm and 6mm marine plywood (BS 1088), instead of the ½ and ? inch that Gavin suggested. With hindsight, my decision to make the outboard well 10 inches wide was wrong. I did not realise that the propeller needs a wider space as the tiller is turned. Although the propeller sits below the boat, it can swing up if you meet an underwater obstruction. I think it is highly unlikely that my propeller will ever contact the side of the well, but with hindsight I should have stuck to Gavin's width of 16 inches.
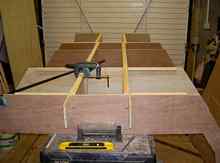
As expected, there were lots of places to make mistakes in laying out the components. I used two tape measures to plot the coordinates, one for the x measurement and the second for the y. I found it useful to draw a centre-line on the symmetrical components to check the symmetry of the points. A few pairs of points remained that were still 1/8th out. I assumed that they were rounding errors, introduced when Gavin rounded the coordinates to the nearest 1/8th of an inch. I adjusted these pairs by 1/16th to make them symmetrical. I did a few typos in the coordinates, which Gavin corrected very quickly. The updated files are available from https://intheboatshed.net. A good time saver was to use a router to copy components that were identical, like the left and right sides and the girders. The frame that supports the outboard motor slopes backward. Although I made mine half an inch oversize at the top, I still had to splice-in a thin piece of plywood to increase its height. If you add gapped inwales, as I did, then the top of the inwale will be higher than the side of the boat, because the sides are flared outwards. It may only be 1/8th of an inch, but the top of the frame will look wrong if it is below the top of the inwale. Gavin has shown a wide, shallow cutout for the motor. I made mine deeper, to match my short-shaft motor, and narrower so that the motor always sits in the centre of the well. I glued the girders, frames, and bottom sheet with polyurethane glue, which hardens quicker than epoxy and can be used in cold temperatures. It forms froth, which has to be removed while it is still soft, but it speeded-up my construction by several days. Cleats were added along the joints to increase the gluing area. I did not want to join the girders and bottom sheets together before I made up the frame, because the long components would be awkward to handle. Instead I made as much of the aft framework as possible and before adding the front framework.
My butt blocks were 5 inches wide across the bottom joint and 12 inches wide across the girders' joint. The butt blocks were trimmed to fit around the girders and access for clamps was good.
The rest was standard, epoxy stitch-and-glue, with taped fillets, inside and outside the joints.
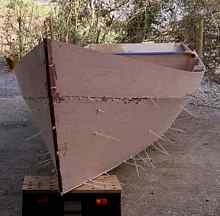
Joining the sides, at the bows, was not straight forward, because they meet at a sharp angle. I fitted and glued the lower sides, before fitting the upper sides. I left the bows loosely stitched and open until after the sides had been stitched and glued to all the other frames. Then I closed the bow joint and used a long, ½ inch diameter, stick to, first, ensure that filleting resin was squeezed right into the angle and, then, to place the tape over the fillet. The upper sides were tackled the same way. Access was tight, but the result is sound.
My local wood merchant had some very nice American Oak that made attractive, varnished gunwales and gapped inwales. The insides were sealed with a spit coat of epoxy resin, and the outside was coated in fibreglass cloth and resin. The inside and outside was painted with a hotchpotch of paints, but I found that exterior grade, one-coat gloss from Wilkinsons, a UK DIY chain, gave excellent, economical results.
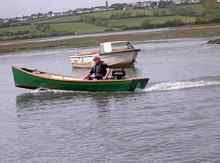
Tuning At first I found that the boats performance was limited because the nose rose out of the water at speed. You can see that the wake is very churned-up in the picture below. It looks good, but it's slow.
The cure was to fit an extension to the tiller (plastic drain pipe) so that I can drive from the centre seat and to adjust the motor mount to tilt it as far forwards as possible. Now the boat cruises, nose down, at 6 mph at 60% throttle, and 7mph flat out. Compare the wake below, after the changes. 7 mph is the theoretical "waterline speed limit" for a 20 feet long boat, i. e. 5 feet longer than this one.
The boat rows nicely, although I find it hard to steer straight when I face backwards. The plastic rowlocks are from Duckworks and the 8-foot oars are based on the plans in Gavin's book "Ultrasimple Boat Building". In shallow channels, I find that a paddle is better.
My boat is named "Percival Pembroke" after an aircraft that I flew in the RAF.
Flat-bottomed boats are known to be prone to nose "slamming", as they pitch down in rough weather. I have experienced this once, when I crossed a large wake from a big, high-speed boat. I found that I could reduce the effect by crossing the wake at a smaller angle. Recently, I used 7 litres (1.85 US gallons) of two-stroke fuel to motor 20 miles, mostly against a 2mph current. Conclusion The Barton Skiff has met Gavin's design aims and continues to delight me. I haven't sailed in rough weather and I don't intend to, but I have started to explore the beautiful local waterways. I'm very pleased with mine. -30- |


