Small boats are nice, including small cabin boats.
But anyone who has messed around much in small boats knows that
sooner or later, everything gets wet. Even in a cabin. You may
have to jump in the cabin with wet feet to grab something quick.
The hatches may be open when a quick shower comes over or an unexpected
dollop of spray. A stray, soaked line may find its way below.
Heaven forbid if it’s a sailboat, you may flip it and flood
the cabin.
Our Frolic2
design, Oaracle, is sometimes a test bed for various nautical
experiments, not the least of which is an electrical system. It
can be set up to run completely on double AA batteries, including
removable LED
running lights and a special watertight box with
a switch that holds eight AA batteries to power the 12-volt compass
light. It can also take a small 12-volt glass matt battery to
run cabin lights, the compass light, and built in forward running
lights. That battery will also power a small inverter for charging
a cell phone and handheld VHF radio.
Murphy’s Law being what it is, it was ordained that the
one time we flipped Oaracle it had the 12-volt system installed,
and of course we flipped it in corrosive salt water. Interestingly,
even though the AGM battery got submerged for several minutes,
it emerged apparently unscathed and continues to work to this
day. Also, the bicolored
bow lights that Duckworks sells survived immersion,
although the bulbs didn’t. What didn’t survive was
the conventional marine electrical switch panel in the cabin.
It was a four-switch panel, with conventional caps on the front
for replacing the fuses.
After the panel’s immersion, the fuse-holder fairly oozed
rust and the wiring contacts on the back of the switches were
brown and green from electrolysis. Yuck.
Oaracle went back to its AA battery electrical configuration,
with the only necessary wiring for the compass light. What got
me thinking about an improvement was a desire for this year’s
Everglades Challenge to reinstall the 12 volt battery. Mostly
it was to allow the use of an electric autopilot, but as long
as the battery was going to be on board, it seemed to make sense
to reconnect the electrical system, especially for the running
and compass lights. All the original wiring was still in place
and in good shape. What was wanted was an improvement of the old
switch panel, capable of withstanding some condensation or mild
spray, or – heaven forbid – a few minutes immersion
should the boat flip and swamp again.
The old AA battery box for the compass light was suggestive of
a solution. It was a cheap "disposable" small food container
sold everywhere, big enough to take the eight AA batteries in
a holder. A hole for a regular marine switch was drilled in the
top, and the switch, held in place with a locking nut, was installed
with caulk. This type of switch can take a rubber boot, sold separately,
which makes it if not waterproof at least highly water resistant.
Then it was a simple matter to run wires to the light, caulking
around where they go through a hole drilled in the side of the
box. (The original idea for the AA battery box came from Doug
Cameron, a fellow competitor from the Everglades Challenge. He
used 8 D-cell batteries in a waterproof box as external power
for his GPS.)
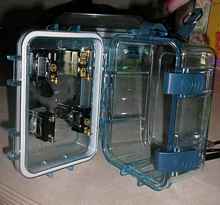
For the new switch box, I got a hard plastic waterproof box,
with an o-ring seal, hinged top, and latches to hold it closed.
It sells for around $6 at WalMart. It is big enough to take four
switches, and probably add a couple more if wanted later (that
would be a pretty elaborate electrical system for a 20-foot boat).
The box is big enough to take all the necessary wiring, plus a
fuse holder for each switch. Putting the fuses inside the box,
instead of having the caps project through the panel, will cause
a little more difficulty in changing a fuse. But the resulting
moisture proofing is more than worth it, I think.
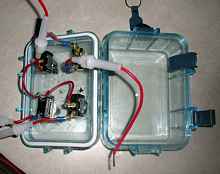
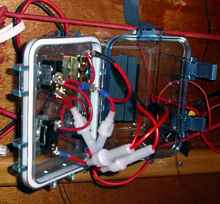
As the pictures show, construction is fairly straightforward.
|
The basic parts for the switchbox: A waterproof
plastic box, marine on/off switches, a water resistant boot
for each switch, and inline fuse holders. |
|
Planning where each switch should go, allowing
enough room for easy wiring on the inside. |
|
The mounting holes are drilled . . . . |
|
. . . . and the switches mounted. No, I couldn’t
find four matching switches. That’s my karma. |
 |
An inside view of the switches, ready for
wiring. |
 |
Installing the fuse holders and other wiring. |
 |
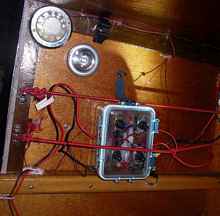
On the boat, connecting the switches to the
battery and the various lights. |
 |
The final result. Well, the wiring needs a
little tidying, but you get the idea. The box controls,
among other things, the permanent waterproof light at the
upper left of this shot. The other light is an AAA battery-powered
touch light. |
A little planning ensured there was enough room between switches
and to make the wiring easy. The wire attachment screws on the
switches were a little on the small side, so ring terminals were
soldered to most of the wires to make installation easy. Once
on the boat, all connections to the wiring was done inside the
box, with the wire joins soldered and covered with shrink tubing
and electrical tape. Small holes were drilled in the box to admit
the wiring, and then the holes were well caulked for water tightness.
The old battery light box was attached to the cabin bulkhead
with Velcro, and I did that again with the switchbox. There’s
shock cord across the bulkhead to hold light items like charts,
and that also runs over the box.
The four switches are used for the forward running lights, the
compass light, a white cabin light, and a red night vision cabin
light.
The new switchbox works exactly as I wished. Let’s hope
it never gets an acid test of a true dunking.

***** |

