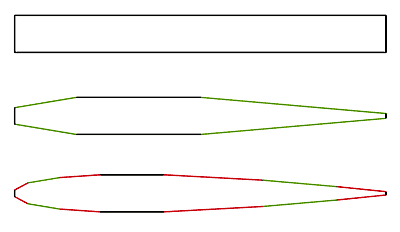
In this discussion, I’ll describe a simple approach to shaping a slab of stock to result in reasonably close approximation of a NACA symmetrical four-digit foil.

click image for PDF version
This approach, like in spar making, is to layout the stock so that material can be removed in a controlled, measureable, repeatable way. Because each cut is planer, progress is easily assessed and the completion of a particular cut is easily verified.
This method works well regardless of the thickness-to-chord width ratio and regardless of whether the plan form or thickness is regular or varying.

click image for PDF version
STEP 1 – SQUARE OFF STOCK
Start by making the stock for the board rectangular in cross section. The simplest boards will be rectangular in plan form. But, if varying in width, mark and cut the board to its plan form shape now, though keep all lines straight until final shaping. Also, if the board is to vary in thickness (this is typical when the chord varies), taper the board now, but keep it rectangular in cross section.
STEP 2 – MARK CENTERLINE, ALL EDGES
Mark the centerline on the leading, trailing, tip, and top edges of the blank. These lines need to remain until final sanding, so mark them clearly.

click image for PDF version
STEP 3 – MARK CUT OFFSETS
Refer to the FoilCuts sketches for the cut offsets. Mark both the first cuts and second cuts marks on the tip and top edges. You may want to use different colored markings to help avoid confusing the two sets of cuts. You can also mark the second cuts offsets after you make the first cuts, if you like.
STEP 4 – EXTEND CUT OFFSETS TO FACES AND LEADING AND TRAILING EDGES
Extend the cut offsets to the faces and leading and trailing edges of the board. These are the marks to which you plane or sand off the corners.
STEP 5 – FIRST CUTS – PLANE TO CUT OFFSETS
Using a plane or a sander or some other means, cut off the four corners to make the board eight sided.
STEP 6 – SECOND CUTS – PLANE TO OFFSETS
Now, remove the next set of corners to make the board sixteen-sided. You may want to restore the second cuts lines on the faces of the board – some will have been removed by the first cuts.
STEP 7 – PLANE REMAINING CORNERS
Once the second shaping cuts are made, the board, with its sixteen faces, will be very close to the final shape. It may be worthwhile to use a hand plane to knock down the most prominent remaining corners along the leading edge.
STEP 8 – SAND SMOOTH
The final shaping is done by sanding. Round all break points, corners, etc.
DEALING WITH VARYING SECTIONS
If the board has a varying plan form, the method still works, but the layout becomes a bit more complex. For example, for a board that tapers from 12 inches at the upper end to 9 inches at the (lower) tip, mark the offsets using a chord of 12 inches at the upper end and the offsets for 9 inches at the lower end, and connect the marks by drawing a straight line on the faces. If there is a distinct break point somewhere in the plan form, add additional layout marks based on the chord width at the break points.
Keep in mind that if the width of the board varies, then the thickness must vary proportionally if you want the same section throughout the foil. For example, if the board varies width from 12 inches to 9 inches, the board should be 1 ½ inches at the 12 inch wide end and 9/12 x 1 ½ inches, or 1 1/8 inches thick at the 9 inch wide end to keep a constant thickness to chord proportion of 12.5%. Any such required tapering should be done prior to making the first cuts (while the section is still rectangular).
Keep all tape lines straight and break points sharp angles until you get to the final sanding stage.
EDGE TREATMENTS
Leading Edge:
The leading edge should be smoothly rounded.
Trailing Edge:
 Don’t feather the edge to a sharp knife-edge – doing so will increase its susceptibility to damage. The layout lines leave the trailing edge about 8 percent of the thickness of the board. Simply round the trailing edge corners just enough to make the board easy to finish and handle. For a centerboard or leeboard, consider beveling the trailing edge somewhat. It will minimize oscillating eddies that setup vibration in the board. This is particularly useful with thin boards. Don’t feather the edge to a sharp knife-edge – doing so will increase its susceptibility to damage. The layout lines leave the trailing edge about 8 percent of the thickness of the board. Simply round the trailing edge corners just enough to make the board easy to finish and handle. For a centerboard or leeboard, consider beveling the trailing edge somewhat. It will minimize oscillating eddies that setup vibration in the board. This is particularly useful with thin boards.
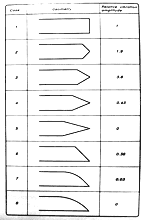
At right is a table from "Principles of Yacht Design", Lars Larsson & Rolf E. Eliasson. (click to enlarge)
Resist temptation to round the tip of the foil section beyond a slight rounding of sharp corners. Rounding will only facilitate the eddying that occurs at this point, reducing the overall effective board area.

Foilcuts Layout PDF
Decimal - Fraction - Percent
*****
Also by Tom Hamernik:
|

