WHY
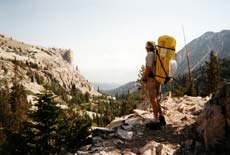
Idaho claims to be the gem state. One of its true jewels is a lake in the Sawtooth Wilderness Area named Alice. I have somewhat arbitrarily decided that it is this particular lake that made me realize how neat it would be to get out on it in a boat: a “well yeah” wish with daunting impediments. The trail into the lake, by back-country standards, is excellent but rough. It is a six mile trek, one-way, with a 1,600 foot elevation gain and six stream crossings (only one with a bridge). You simply wouldn’t take a rigid boat into Alice: leaving foldables or inflatables.
In recent years, there have been several interesting and worthy inflatable, folding and hybrid boats put on the market. However, even with the newer models, the main drawback of the commercially available boats is weight. My goal was to create a boat weighing around 10 pounds, leaving me with room to pack all the necessities for a day hike and still carry in only about 20 pounds total.
I started this project about the same time as Noah (no design phase required--he had detailed instructions), but now I have come up with some pretty detailed plans and directions on how to build a truly lightweight, foldable, flat-water boat that can be launched on remote, pristine, magnificent, magical, etc., etc., waters, and it only weighs ten pounds.
| The trail into the lake |
 |
WHAT
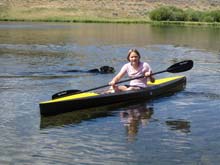
Skin on frame kayaks have been around for thousands of years with various shape and framing configurations depending on locale. Folding skin on frame kayaks have been produced for a hundred years now. Some utterly amazing voyages have been made in these craft: ocean crossings, etc. An Alice is sort of a distant cousin to most of these traditional and commercial boats. First of all, Alice is pretty much a flat-water boat not meant for hunting (though fishing works), crashing surf, rock gardens or white water. And it’s a day boat not meant for paddling expeditions. Thus the interior space does not need to be open for storage but can be utilized to make a light as possible frame structure. The ideal venue for this boat is a remote, crystal clear lake that can be reached only on foot. Carried on the boat in the water: a jacket, lunch, emergency repair kit (duct tape) and water filter.
Some preliminary remarks are in order before we get to information about the boat’s design:
First of all, there are almost as many books on how to build boats as there are cook books. However, to the best of my knowledge there are some significant differences between Alice and any other boat I know or have heard of.
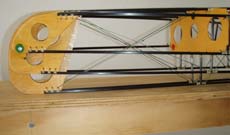
For starters, the rigid part of the structure, while maybe not completely unique, is certainly unusual. The heart of the Alice design is the three pairs of lightweight trusses made up of five sections each used to form the structural framework. With someone sitting in the boat in the water, the frame structure wants to bend down (sink in the middle). This beam bending is generally the biggest stress on a boat that must be accounted for. The most efficient beam (strength to weight) is some form of truss. Ergo, the structure of Alice is three pairs of laterally curved trusses.
A few words about some of the key materials:
An Alice boat requires approximately 190 feet of 0.240 inch diameter carbon tubes. Certainly, other materials such as fiberglass or aluminum could be substituted. However, any other combination than that recommended, though cheaper, will surely weigh more and may not be rigid enough. Simply put, of the other materials currently, commercially available, carbon is going to provide the optimum combination of strength and weight and take up the least amount of space. However, with the general inflation of material prices, and the fact that more and more carbon is being utilized for aircraft, etc., a truly lightweight boat is not going to be truly cheap, even if you build it yourself.
 |
Cowboy reentry |
There are two ways to produce carbon tubes. The low tech way is to squirt (pultrude) the material through a die then let it cure. The second, more sophisticated, way results in a more expensive product that is generally not as tough. So, it turns out that this is one of those rare occasions where cheaper is better. The price for fifty-eight, 40 inch tubes, on 08/18/08 was $260.00, not including freight.
The recommended skin (fabric) for an Alice boat is aircraft Dacron polyester. One of the trade names is Ceconite. It generally comes in three weights, and Alice uses the heaviest (3.4/3.7-oz. per sq. yd.). You can use either certified for aircraft, or for a little less money, uncertified, with the only drawback that there may be blemishes in the material, but it will work just fine. Besides being light and strong, the polyester also has the outstanding characteristic of being heat-shrinkable. The skin of an Alice boat is literally shrink-to-fit, and the amount of possible shrink is an amazing 10%.
Once the skin has been shrunk, it needs to be waterproofed. Hypalon (DuPont) has been used to coat the fabric of quality folding kayaks for many years. One of the major differences between regular, manufactured folding kayaks and an Alice is that, for the manufactured boat, the Hypalon is applied to the fabric in a factory environment, which precludes later shrinking. For the manufactured boat skin, the coated fabric is cut and the seams sewn or welded together much like making a piece of clothing. There are other products that could be used, but it is strongly recommended that the time-tested Hypalon be utilized. Principal disadvantages are product cost and shipping cost. If you are content with a single color, you can probably get a minimum one gallon order for $140, which includes a hazardous material shipping fee.
A remarkable feature of Hypalon is that it is almost totally soluble in the common solvent Xylene. You can thin and refresh it almost indefinitely. If things go terribly wrong in the coating process, you can remove and redo. Another nice property is that you can do a cosmetically acceptable job of coating with a brush (foam brush if you like). The trick with a brush is to apply in very thin coats.
There is one other item that I feel compelled to mention at this point, and that is that an Alice is not meant (or designed) to roll. The fact that it is an open cockpit recreation kayak should be sufficient reason. But, given its stability, it shouldn’t be an issue anyway. I believe I have done enough calculations to satisfy the most technically obsessed, but in the stability category, I have found an even more reliable measure: is seat of the pants, my wife says it’s stable, and by G it’s stable.
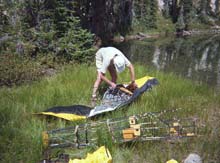
For those not familiar with the term, they have been calling folding kayaks, “folding kayaks” ever since they were first developed. Assembled and disassembled is a far more accurate description. One of the trade offs for light weight has been speed and ease of assembly. On a really good day, with no mistakes, I can put an Alice together in roughly thirty minutes. However, from inside the bag to ready for the water with seat cushions etc. a more realistic time is probably forty to forty five minutes.
| Putting Alice together |
 |
DESIGN
Of the three elements of kayaking: design, build, paddle, for me building is in last place. But, between designing and paddling, the enjoyment is at least equal, and designing may just have an edge.
For me, when a backpack gets up around 30 pounds, I’m not having fun. Early on I arrived at the conclusion that, if this idea (goal) was going to work for me, the boat itself couldn’t weigh much more than 10 pounds. When I started the project, I wasn’t at all sure that it was possible. In fact, I had some fairly knowledgeable people tell me that it wasn’t.
So, other than the basic--the water stays on the outside--the first three design criteria were: 1. Light weight, 2. Light weight, 3. Light weight. Then, in no particular order, came: 4. Compactly folded, 5. Easily assembled, 6. Low resistance (easily paddled), 7. Laterally stable, 8. Good tracking (maneuverability not much of an issue since, for the most part, the boat will be paddled in a straight line, and it’s only 12 feet long), 9. and, finally, that it be a real boat (not something with the hydrodynamic characteristics of an innertube).
I made a couple full-scale test hulls out of rigid foam insulation: a catamaran and a monohull with outriggers (maybe it was a trimaran). About the time I realized that a simple monohull would meet my stability requirements and have the least resistance, I discovered Platt Monfort and his amazing, truly lightweight boats. It was only then that I begin to believe that my goal might be achievable.
I bought a set of plans and instructions from Platt and a set from “Mac” Mc Carthy (the wood stripper guy). I pretty much used the lines of a famous canoe “Wee Lassie” below the waterline and built a 10’ 5” wood frame folding kayak. I liked how it looked, handled, etc. However, the wood frame was too heavy and complicated, and most of it ended up in the fireplace. But I salvaged the skin. With considerable effort, I made a carbon tube frame (foldable) that fit inside the original sin (skin). The tubes were carbon arrow stock, and the sliding connectors were also of aluminum arrows. I named this boat Alice after Alice Lake. At first, my wife, Barbara, took exception to this but later thought she liked the idea. I still have it. I still use it, and I still do test things on/with it.
 |
Test Pond |
There was always supposed to be two boats: one for me and one for my wife (assuming the second boat would be an improvement over the first, Alice II would be mine). It was only much later that I realized that, if we were going to hike into some lake, we would only pack one boat and take turns.
Up until now, I had kept calculations to a minimum and done them all by hand. I had gone through engineering school with a slide rule (I’m wondering how many people reading this know what one is). I had never found any compelling reason to become computer literate. So—big, exciting, scary step--I bought a Naval Architecture CAD program. I chose New Wave Systems. Because of the similarity of my hull to a hard chine boat, I was able to get by with their entry level Pro-Chine 3 Hull Design and Fairing Program for $200: more expensive than a computer game but more fun.
Considerable time passed before I gained enough skill to come up with the lines for Alice II. Although challenging and frequently frustrating, this was really rewarding. Move one point on the lines, and the program would change and fair all three views and recalculate everything.
A CAD program will give you a boat with fair lines but not necessarily a well-designed boat. The art and science of naval architecture needs to be brought into play in order to expect that a boat will have good characteristics and qualities. It’s that, or you’re stuck with trial and error. Fortunately, the basic principles and design parameters can be summarized and found in numerous books. An excellent article by Ted Brewer appears in a previous issue of Messing About In Boats. What follows are some of the steps I took in the design process to give you an idea of how it works.
Because of the need for compact folded dimensions, length was fixed at five sections per truss, at roughly 29 inches each, giving me a 12 ft. boat. I wanted a minimum beam (width) but knew that around 24 inches was about as good as I could hope for.
| Frame showing seat |
 |
Getting into the project, I carefully studied the kayak reviews in Sea Kayaker magazine (Chris Cunningham, the editor, was the person that put me on to the Messing About In Boats publication). From the reviews, I decided that a reasonable hope was a boat that would cruise at about 3.25 knots (3.74 mph) at around two pounds resistance. The 3.25 gave me a speed to length ratio of 0.938 and a recommended Cp for kayaks of .54 to .57. Cp, the prismatic coefficient, is simply a number that gives an indication of how fat or skinny the ends of the hull are. With these, and the proven ranges of a few other parameters, I could enter the program and quickly come up with a starting point hull.
A CAD program will not automatically give you an optimum hull. What you have to do is play off desirable characteristics against each other like stability and resistance. It’s not really trial and error: more like trial and adjust or trial and refine. Eventually, you will arrive at what you feel is the best deal you can get. And, in the case of a 12 ft kayak, it’s only a few hours at most.
From lines to plans was another hurdle. Rather than try to use the CAD program, I took advantage of my access to a version of Autocad. The catch was I had to do the work myself. If anybody out there has heard stories about the challenge of learning Autocad, I can assure you they are all true (most likely, the real story is worse).
I was really pleased with Alice II, but there were so many things I wanted to improve. I decided to go on. There are those, probably including my wife, who would count this as some kind of character flaw.
 |
The stern |
Upon completion of Alice III, I felt I could settle on a final design. In other words, declare it good enough and stop fiddling with it. And, somewhere during this process, I decided I wanted to come up with complete plans and instructions on the outside chance that someone else might want to build one. So, I tweaked the Alice III design and built Alice IV, largely to check the accuracy of the plans.
So, here are some of the numbers for fresh water. People really into kayaks will note that they bear some resemblance to the format in Sea Kayaker magazine:
| |
150 lb. paddler |
210 lb. paddler |
| Length overall |
12.0' |
|
| Beam (width) |
24.0" |
|
| Cockpit size |
15" x 49" |
|
| Draft (depth below waterline) |
3-1/8" |
4" |
| Prismatic coefficient |
.56 |
.58 |
| Wetted surface in sq.-ft. |
16.48 |
18.64 |
Speed vs. Resistance (in pounds) as calculated using Winters KAPER formula (uncorrected for skin type) as found in my CAD program
| |
150 lb. paddler |
210 lb. paddler |
| 2 knots |
.73 |
.83 |
| 3 knots |
1.53 |
1.75 |
| 3.25 knots |
1.83 |
2.12 |
| 4 knots |
3.17 |
3.75 |
Stability (righting moment in ft - lbs)


I think I should point out that, except for resistance, all the above numbers are real. They were arrived at simply (for the computer) by solving equations for definite mechanical relationships. Resistance, on the other hand, is theoretical, arrived at by computer modeling from the test results of similar hulls.
 |
Framing |
PLANS AND INSTRUCTIONS
I’m finally ending a project that has given me a lot of enjoyment and a sense of accomplishment. I would recommend the process to almost anyone. It really doesn’t require an engineering degree to get through it. Yeah, it took an embarrassing long time, but I greatly increased the scope after starting. And, now, I own four neat boats that can accommodate me, my wife, kids, and /or grandkids, or friends. And, I have made it possible for someone to build one of their own without going through the design phase.
So, with the clear understanding that the only person who thinks that a set of plans and instructions are complete is the person who made them, here is what is available, along with my e-mail address for questions:
For $100.00, you’ll get a 16 ft. roll of full scale plans plus a 54 page book of instructions that includes a materials list with addresses and lots of pictures. Also included is a simple metal template to help in trimming the fabric and a small jig that greatly simplifies and eases the making of the 400 little wire brackets integral to the design.
At the date of this writing (3/3/09) the cost of materials, not counting seat cushions, should run about $675.00.
An educated, and I hope conservative, guess for time of construction, I’ll say, is 300 hours. I’d like to think that it wouldn’t take the average person that long, but I believe most people would agree there are just too many variables to expect a hard number. It is my sincere hope that this estimate is realistic.
Finally, it wouldn’t surprise me, or greatly disappoint me, if I didn’t sell one set of plans and instructions. To reduce it to current jargon, I have achieved closure.
Chuck Corwin, PO Box 689, Ketchum, ID 83340 - aliceboat@cox.net
***** |

