| Minor Customisation from
John Welsford’s plans
I thought I’d just note a few of the minor
changes I’ve made to John Welsford’s plans,
to ‘customize’ my Truant
sailing dinghy. “TruantSea” was built
to serve a number of purposes:
- A day boat to go fishing harbours, estuary, lakes,
rivers or streams with my darling wife, or a couple
of mates, or the grandkids (when they are older).
- A sailing dinghy to teach me how to sail better,
keep me dry and let me launch and retrieve it single-handed.
- A small cruiser to carry basic camping gear for
1 or 2 people, for a night or two away.
It has fulfilled its purpose admirably. The items
mentioned achieve those aims better, safer or more
comfortably. BUT, in its basic design, Truant is still
a mighty fine boat!
Please refer to the relevant pictures…
DRAINS
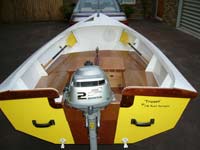 |
Photo 1 - Screw
bungs go through the transom to allow exit of
draining water. |
As I wanted to frequently carry overnite camping
gear in the boat, I installed 2” drainpipe tubes
in the centre compartments to carry excess water from
the forward area to the rear footwell. This allows
the 2x large compartments to remain dry and watertight
for storage.
More 2” drain pipes were installed in the transom
buoyancy compartment to allow the same for that area.
These tubes terminate in exterior screw bungs fitted
through the transom. The idea works superbly!
I also drilled holes at seat level in each of the
bulkhead panels to allow water to drain to the rear.
Screw bungs go through the transom at rear seat level
to allow exit of draining water. These are absolutely
necessary when washing out the boat after fishing,
or after spirited sailing, or after rain.
HATCHES
To access these extra storage areas I made hinged
wooden hatch lids midships, retained with shockcord
and u cleats, with a shop-bought plastic rectangular
hatch at the stern. The rear compartment is so easy
for easy items like sponge, camera, cellphone, tools,
etc, which are now all at hand whilst out in the boat.
(see photo 3)
ANCHORWELL
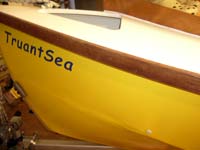 |
Photo 2 - It
seemed so much easier to create a permanent
space (with its own external drain outlet),
to put the anchor, chain and rope. |
It seemed so much easier to create a permanent space
(with its own external drain outlet), to put the anchor,
chain and rope. The anchorwell keeps the boats interior
dry, clean and uncluttered. The wet boatshoes and
other small bits also go in there too.
SEATS
In fishing mode we fit curved wooden seats to the
midships hatches. These are attached with 15mm diameter
x 2” stainless steel bolts and wing nuts. They
take about 90 seconds to install, swivel 360 degrees
on nylon bases – but usually face to the stern.
They are so much more comfortable on the back, when
out for a few hours just sitting with a fishing rod,
and only 90 seconds to remove and bung the holes in
hatches. (see the seat mounting holes in
photo 3)
FOOTWELL
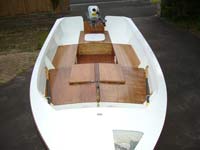 |
Photo 3 - I
made hinged wooden hatch lids midships, retained
with shockcord and u cleats, with a shop-bought
plastic rectangular hatch at the stern. |
Johns plans use ply doublers under the leading edges
of the seat panels, overhanging the footwell area
by 25-50 mm all round. I dispensed with these and
cut the horizontal panels flush with the vertical
faces and gained up to 100mm of extra legroom in that
area. Really handy for two adults out for a fish or
a sail. The edges are ‘softened’ with
a ½ round timber moulding of only 10mm (glued
and nailed) at the junction of the two planes of those
panels.
RUBBING STRIPS
I got some 3” x 1” Kwila hardwood decking
timber ripped lengthwise on both axis to give me 1
½“ x ½” strips to screw
onto the gunwales for rubbing strips. It’s as
hard as hell, takes the knocks, needs no coatings
and is easy to replace if it ever gets really damaged.
It also adds a nice ‘natural’ finish to
the boats exterior. (see photo 2)
COAMINGS
For more comfort whilst sailing, made wider that
normal coamings. These are now approx 6” wide
to allow extra back support. They also allow a number
of smaller items to be tucked up underneath them out
of the sun etc. (see photo
1 - photo 3)
RUDDER LIFTERS
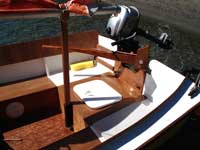 |
Photo 4 - Two
ropes attached to the forward and aft edges
of the rudder allow it to lift and lower. |
Two ropes attached to the forward and aft edges
of the rudder allow it to lift and lower. A small
cleat on the tiller holds either of the ropes - to
keep the rudder in position. It works well.
ROD HOLDERS
These perform more than just the obvious function.
When trailering the boat I put hardwood blocks with
a 1½ ” diameter dowel underneath, in
them. These stop the ratcheted cargo straps tying
boat down to trailer to not damage the comings or
paint.
A different pair of blocks also hold cam cleats to
retain the jib sheets when sailing.
Other than that, the rod holders are strategically
located near the wooden seats for instant access to
reel in those big fish. A single rod holder is also
located at the rear of the footwell, for trolling
in freshwater and it also houses the boom support
when the sail is lowered, but not removed. (see
photo 6)
CENTREBOARD
Instead of having exposed lead ballast in the board,
I built up my unit with 2x layers of 9mm and one centre
layer of 12mm ply. I cut a large hole in the lower
portion of the centre layer and cast the lead into
that – retaining it with pins and screws all
around the edges of the hole. The lead was levelled
and smoothed, then the three layers of the centreboard
were glued and clamped together. An altogether nicer
finish, even if it isn’t seen.
OUTBOARD BRACKET
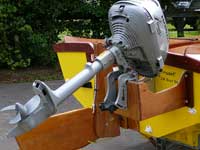 |
Photo 5 - I
bought an old aluminium outboard bracket, sanded
the oxidisation off it, and glued 3mm ply to
the exterior. |
I got sick of shifting the outboard from centre
of the stern to stowing it up front in the boat when
sailing. I would not dare go on the water without
it for any distance! But I wanted to keep to the rather
traditional natural look. So I bought an old aluminium
outboard bracket off the internet, sanded the oxidisation
off it- back to bare metal, and glued 3mm ply to the
exterior. I think it looks great and is in keeping
with the look.
FLOOR PANELS
I made two ply panels for the forward footwell area.
These are held in place with 2 stainless screws each,
but are easily removable. The ‘dress’
up that area which originally shows the stringers
and underpanel of the boat. (see photo
3)
GAFF RIG
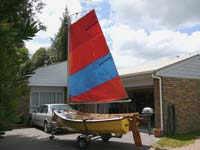 |
Photo 6 - I
got hold of a 2 piece 14 foot mast and sail
and cut that sail down to a gaff rig. |
After diverting from the traditional balanced lugsail
John recommends (only because of finances mind you),
originally fitted a BERMUDAN rig with 20 foot mast
from a 13 foot father & son racing dinghy. Whilst
it had phenomenal performance to windward, it was
a real handful in a blow for this novice sailor. In
fact I felt a little scared by the power of the thing
sometimes! I got hold of a 2 piece 14 foot mast and
sail and cut that sail down to a gaff rig. A wooden
handle swivel mop and a few brass eyelets gave me
the gaff and lashing points.
This ‘new’ sail is better downwind,
more manageable in gusty conditions and overall ‘softer’
somehow. Whilst the gaff rig is not as good to windward,
I am quite willing to sacrifice that for a nicer,
safer feel. Who knows I may actually revert to JW’s
advice and fit a lugsail when finances are better.
I must confess I am no boating expert.
I do however feel I have enhanced John Welsfords design
for Truant – at least for my use of it.
I hope these simple ideas give rise to thoughts and
modifications others may wish for their boats –
whatever the design.
GRAHAME HARRIS.
|