| Cheap 4 x 24 Orbital Sander
Thanks so very much to you and all of those who have
contributed so much with ideas, processes and expertise
to help all of us attain better quality results with
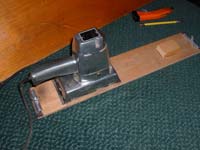
our boat work. Perhaps the photos of my orbital sander
conversion will help ease the chore and improve results
for some of your readers while performing initial
hull fairing on their boat projects. Hopefully these
photos will inspire variations on this theme. This
particular unit works best on convex curves and larger
surfaces.
 |

|
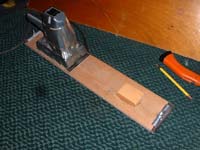
Using a $2 (yard sale) Craftsman Orbital sander whose
felt pad had nearly disintegrated and the wing-nut
sandpaper fasteners from a discarded drywall hand
sanding block, I fashioned the 4 mm plywood platen
extension shown on the old sander, removed the metal
base originally holding the felt, and using contact
cement, attached the plywood to the sander. It has
held up for over 5 years and probably 100 hours of
use on various projects. This plywood base was sized
to use standard 4" x 24" sanding belts.
I have made several versions of this set-up, both
powered and manually operated, using different widths
and lengths and thickness of sanding block material
and different sander motors. I have found that scraps
of the 2 mm think, dense, foam underlayment used for,
"Pergo," type floor installations makes
a good backer between the sandpaper and the sanding
block.
My Small Job Paint Sprayer
Recently needing to do a small spray finishing job,
I initially hesitated to begin the job because of
the work and effort needed to clean my regular spray
finishing equipment so thoroughly after each use,
for such a very small project. Being a person who
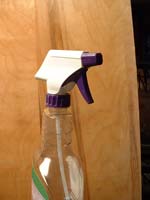
recycles and who hates to throw anything away, I remembered
the household cleaner, spray bottle that I had just
emptied the day before in the process of scrubbing
the bath tub and thought to myself that I might have
the answer to my dilemma. With a simple dish detergent
wash, clean water rinse and thorough drying , I had
in hand my new low pressure, spray finishing equipment
for this project. I thinned a small quantity of varnish
and tried the sprayer in a cardboard box. With very
little overspray, I could vary the spray with this
particular nozzle by squeezing faster or slower as
I swept the nozzle across the work surface. With a
couple of coats of finish (allowing for proper drying
time), I completed my original project with my new
sprayer, with very little fuss and no need for extensive
cleaning of any equipment.
 |
|
Being so very pleased with my new tool, and having
small amounts of varnish in a couple of different
cans that needed to be used up, I thinned, strained
and mixed the dregs of these compatible finishes,
filled my spray bottle and proceeded to make short
work of revarnishing some wood spars, two pairs of
oars and the wooden handles of my arsenal of garden
tools. All this work was done over the period of a
couple of days. The bottle and sprayer seem to be
in good condition and the nozzle has yet to clog.
I simply turn the nozzle to the Off position and wiped
the surface of it with a clean rag when I am finished
with it.
Refilling containers with substances other than what
they were originally intended for is not recommended.
Carefully and clearly label all your shop materials,
and as always, keep finishes and cleaners in a safe
place and away from children and pets.
Don Freix
Northeast Wisconsin

|