|
Sailboat Drain Plugs |

|
When most sailors look at a drain plug, they just see a drain plug which is typically installed in the stern transom to drain out bilge water. When I see one, I see all sorts of potential for various uses.
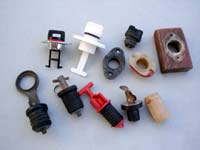 (click images for larger views)
 |
There are a wide variety of drain plugs as shown here. The most basic drain plug is a cork from a wine bottle. Sand one end to make it more cone shaped to fit in the hole easier. The big drawbacks of corks is that they often break when you try and pull them out. Next was the rubber cork shown on the bottom row, they all have compression devices in them. Three have a combination screw compression with a lever to make a final pull to compress and fill the drain hole, while the 2nd from the left only has a screw compression mechanism. The top row are flange and bung drain plugs. Have you ever heard Beavis and Butthead say "I need TP for my Bung Hole"? Well guess where that came from. The last thing in the upper right corner is a standoff block that I made, it is to make the entire flange mount on the outside of the hull, so when the boat is propped up, water will completely drain thru the hole instead of leaving a little bit around the rim.
|
|
|
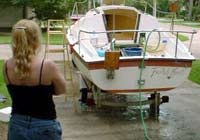 Here is your typical use of a drain plug. Put one in a low point on your transom, prop the bow up and you can quickly clean your boat out, letting all the dirty water drain out. Also if you collected some water in the bilges, just undo the drain while pulling up the ramp. Here is your typical use of a drain plug. Put one in a low point on your transom, prop the bow up and you can quickly clean your boat out, letting all the dirty water drain out. Also if you collected some water in the bilges, just undo the drain while pulling up the ramp.
There are a wide variety of idiots that roam the public boat ramps, and if one of them decides to liberate your drain plug, you can always stuff a rag in there to plug up the hole, so it won't ruin your day out sailing. One of my friends owned a Potter 15, and he related a story about going sailing and the boat seemed sluggish after an hour or so. They had been sailing with the cabin closed, and upon opening it discovered it was full of water, the only thing keeping them from sinking was the full foam floatation installed under the berths. He had forgotten to replace the drain plug and left it at home. So he just crammed a rag in there, bailed the water out and sailed for the rest of the day.
|
|
How To Install A Transom Drain Plug
|
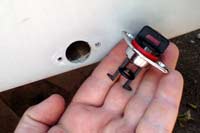 I have installed a number of drain plugs, and in the beginning I was a bit sloppy about it figuring that I could just slap one on with some silicone and go sailing. They leaked, sometimes letting in gallons over the course of a day sailing and I had to pull them off and re-bed them, so here is what I do now. I have installed a number of drain plugs, and in the beginning I was a bit sloppy about it figuring that I could just slap one on with some silicone and go sailing. They leaked, sometimes letting in gallons over the course of a day sailing and I had to pull them off and re-bed them, so here is what I do now.
First I drill a proper size flange hole and screw holes. This boat already had them and I am re-bedding a drain plug to it.
|
|
|
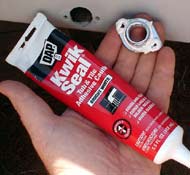 Many people use silicone, but it doesn't have any adhesive properties and tends to stick only to itself, and shrinks a bit. I switched to using DAP Kwik Seal Tub & Tile adhesive caulk. It stays rubbery when cured, and does have some adhesive qualities, but is not a super strong bond so when I want to remove the piece, it will come off with a little effort. Many people use silicone, but it doesn't have any adhesive properties and tends to stick only to itself, and shrinks a bit. I switched to using DAP Kwik Seal Tub & Tile adhesive caulk. It stays rubbery when cured, and does have some adhesive qualities, but is not a super strong bond so when I want to remove the piece, it will come off with a little effort.
When applying the sealant, you should make a pass around the base of the flange and also a circle around each mounting hole. Then when pressed against the hull, some will squeeze into the countersunk area where the screw goes, and seal around there too.
|
|
|
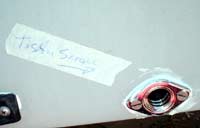 When installing the screws, DO NOT TIGHTEN ALL THE WAY. You should apply just enough pressure to slightly squeeze the sealant. What this does is lets the sealant form a gasket, which later after curing, you tighten the screws the rest of the way to compress the gasket and make a water tight seal. When installing the screws, DO NOT TIGHTEN ALL THE WAY. You should apply just enough pressure to slightly squeeze the sealant. What this does is lets the sealant form a gasket, which later after curing, you tighten the screws the rest of the way to compress the gasket and make a water tight seal.
The masking tape is a reminder to come back later and tighten the screws. Most of the time I spend working on the boat is done is short sessions like a half hour here, and hour there etc. If I think of something I want on the boat, I'll write a note on the tape and stick it near where the improvement goes so when I get another opportunity to work on the boat, I will know what to get working on. Sometimes I haven't completed all my little "improvements" and end up taking a boat to a messabout with a few little pieces of tape here and there....
|
|
|
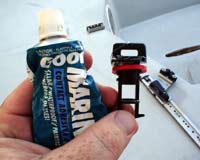 Another annoying thing is that after a while, the rubber gasket tends to shrink, making it loose enough to fall off. I have dropped a few and lost them, and haven't been able to buy replacements without having to buy a new bung too, so I started putting a little marine goop between the gasket and the bung. Marine goop is clear like silicone, but has incredible adhesive properties. It sticks to just about anything including a plastic to plastic joint. To keep the gasket from getting brittle and cracking, you can apply "magic lube" which is typically used on the gaskets of pool equipment. You can buy a tube of it at Home Depot. Another annoying thing is that after a while, the rubber gasket tends to shrink, making it loose enough to fall off. I have dropped a few and lost them, and haven't been able to buy replacements without having to buy a new bung too, so I started putting a little marine goop between the gasket and the bung. Marine goop is clear like silicone, but has incredible adhesive properties. It sticks to just about anything including a plastic to plastic joint. To keep the gasket from getting brittle and cracking, you can apply "magic lube" which is typically used on the gaskets of pool equipment. You can buy a tube of it at Home Depot.
|
|
|
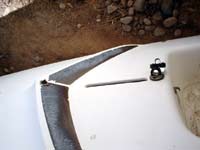 Drain plugs aren't just mounted on the transom, here is an example where a drain plug was mounted on the top deck, this boat was mostly stored upside down and the lowest point became part of this molded in spray rail. Drain plugs aren't just mounted on the transom, here is an example where a drain plug was mounted on the top deck, this boat was mostly stored upside down and the lowest point became part of this molded in spray rail.
|
|
|
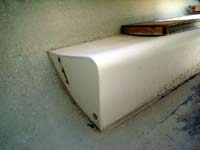 Here is an example where the drain plug was installed in the ends of an emergency floatation airbox. Here is an example where the drain plug was installed in the ends of an emergency floatation airbox.
|
|
|
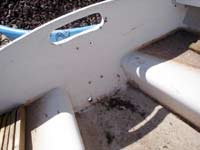 There are many boats which are stored without covers on them. This one was stored for many years on a trailer which was propped up. When the rain would come, the water drains out the stern hole. There are many boats which are stored without covers on them. This one was stored for many years on a trailer which was propped up. When the rain would come, the water drains out the stern hole.
|
|
Dinghy Bailer
|
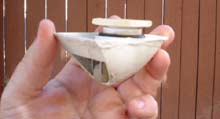 Another interesting thing you can do is convert a drain plug into a dinghy bailer. This is an example of a sunfish type bailer, it is mounted thru the hull. The bottom is a cone shape which faces aft. As the boat sails forward, the cone shape creates suction and pulls water out of the foot well. The top of the bailer usually comes with a cork. The ball in the bottom is supposed to float up and plug the hole when the boat isn't moving fast enough, but I have yet to experience it working properly. What I typically do is sail around with the top corked, and when enough spray water gets into the foot well, I open the bailer to pull the water out. When enough is gone, I cork it again, or in rough conditions where spray is continually coming in, I just leave it open and sail with wet feet. Another interesting thing you can do is convert a drain plug into a dinghy bailer. This is an example of a sunfish type bailer, it is mounted thru the hull. The bottom is a cone shape which faces aft. As the boat sails forward, the cone shape creates suction and pulls water out of the foot well. The top of the bailer usually comes with a cork. The ball in the bottom is supposed to float up and plug the hole when the boat isn't moving fast enough, but I have yet to experience it working properly. What I typically do is sail around with the top corked, and when enough spray water gets into the foot well, I open the bailer to pull the water out. When enough is gone, I cork it again, or in rough conditions where spray is continually coming in, I just leave it open and sail with wet feet.
|
|
|
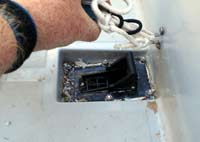 Here is a more elaborate bailer, it has a drop down cone. Here is a more elaborate bailer, it has a drop down cone.
|
|
|
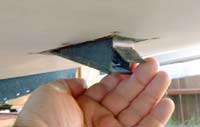 Instead of the ball, it has a little door that swings open. Like the other, if you leave this one down when you are not moving fast enough, it will let water come back in. Instead of the ball, it has a little door that swings open. Like the other, if you leave this one down when you are not moving fast enough, it will let water come back in.
|
|
|
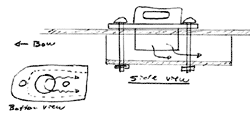 Here is a dinghy bailer you can make with a drain plug. Simply mount the plug in the bottom of the boat with a V shaped cowling around it. Put a cap on the bottom of the V shape but leave the aft end open. Here is a dinghy bailer you can make with a drain plug. Simply mount the plug in the bottom of the boat with a V shaped cowling around it. Put a cap on the bottom of the V shape but leave the aft end open.
|
|

|