Garvey 13
by David Farr
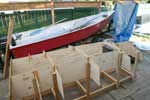
Through a strange set of circumstances, I find it “necessary” <grin> to build another boat. I have been working with wood and building boats off and on since I was a kid. The last boat was a Bolger Diablo. You can see it in the background of the pictures below. This was the first boat that the kids and I built with epoxy resin. The first 4 were with polyester resin. The boat is now 4 years old and the two boys that helped build it have grown up and have married to wonderful wives. The oldest and his wife had our first grandson late last year. Our daughter Hannah who is 13 enjoys fishing and building stuff with dad. Through a fortunate set of circumstances, we ended up with a ¾ pick up, a used truck camper and a 5x10 utility trailer.
 click images to enlarge
 |
We enjoy camping a lot and for the first time, don’t have to sleep on the ground! With all the spare tires, lawn chairs, tool boxes and miscellaneous stuff, the utility trailer was one of those things I should have found 10 years ago! So, that being said, the Diablo is going to find a new home and I wanted to build a boat that will fit inside the utility trailer. The 5’ wide trailer is really 5’3” so that was the maximum beam that would fit in to a ‘square’ box. It is exactly 10’ long. With a little sticking out each end, 13’ would be about the length. A quick look through the numerous plans that I have purchased for ‘some day’, I pulled out the Garvey 13 plans for Batau.
https://www.boatplans-online.com/studyplans/GV13_study.htm
 We live in the Pacific Northwest North of Seattle. In considering this design, I wanted to keep a few of the good things about the Diablo and incorporate some new ideas from hours of day dreaming about the ‘perfect’ small boat. The primary use for the boat is sightseeing and fishing. It needs to go with us all the time in the utility trailer and be ready when needed or just along for the ride. It needed to be about the same weight or lighter than the Diablo because of the maximum legal GVW for the truck/camper/trailer combination (to be legal and safe anyway). I have always liked the Garvey design in general. Even with it’s square transom forward and aft, I think it still looks like a proper ‘work boat’ and will work great as the utility trailer boat. When camping, it could be just the 3 of us or more if the older kids can get away from the daily grind and meet up with us on the weekends. The new boat would need to comfortably take a lot of us (at displacement speed) to a nearby fishing hole.
 The Diablo, with it’s 2’ wide flat bottom and wide chine flairs did well, but pounded (and flexed) pretty good when going through the chop found most of the time on Puget Sound at speed with a 25HP outboard. Running up the glass smooth Snohomish River or on the rare flat calm day in the saltwater, it really flies.
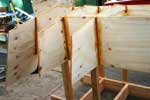
 The original plans call for 4 bench seats. It has an interesting way of creating a triangle support to reinforce the bottom panels. I chose instead to create 8’ long seats running the length of the boat like the Diablo. The first 2 frames (from the stern) on each side are to be filled with foam and sealed for floatation along with the bow seat. This will give about 550 lbs of positive floatation. The next two on each side with have hinges and storage that will be about 16”x16”x30” (4 total). Good place for bumpers, small anchor, safety gear and ‘stuff’. There is an open end and another 16” to the front frame/bow seat. You can also see this on the photo’s taken ‘under’ the frame. I am going to make ‘grates’ that flatten the ‘V’ bottom out like a sailboat. It will also have strips on the side of each seat so you can pick up the grate and place it on these strips to make one big 8’x5’ flat area. With the right combination of boat cushions and grates, you could make a very nice ‘lounge’ to relax or sleep on.
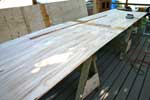
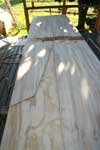
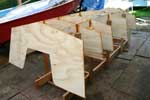 I started a little late on the pictures, but most who have built boats will find the lofting, cutting and joining panels look the same on most projects. The pictures start with the ladder frame with the 3/8” plywood pieces cut out and attached appropriately. The long panels were joined with front and back layers of glass tape sans the standard ‘block backer’. Sandwiched with layers of polyethylene and screwed through with wide strips of scrap plywood. First time for this method and it seems to work very well. Got some help from the wife and our daughter and sprung my favorite batten to mark the fair curves on one panel. Cut those out and used them as templates for the second set making sure I was making ‘mirror’ images.
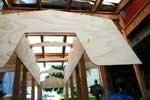 Laying the bilge panels on the frames seem to come out perfectly. As on the Diablo, I am more a ‘tack and tape’ guy rather than ‘stitch and glue’. The second departure from the plans was to make the sheer panels a full 24” high. The original plans call for 17-1/2”. There are many personal issues in changing a designers set of plans. You can screw up a boat very quickly and ruin the looks, safety and pleasure of a boat by changing it even a little bit. In this case, all the dimensions are similar but I know have some extra ‘insurance’ when launching, beaching and carrying a load in chop. One benefit of this change is being able to raise the seats to a full15-1/2”. It also gives one the opportunity to lean back against the upper shear and find a comfortable position to travel or rest. The ‘standing’ area is now in the middle of the boat where an inadvertent foot placement will not cause a huge imbalance in load. You also tend to use more than the required amount of plywood.
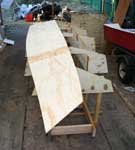 I am using a different kind of plywood for this boat. It’s called Aruacoply - it’s imported from Chile from 100% plantation forests, is solid all the way through and the species is Radiata Pine. It’s virtually clear on the face and small or no knots on the back side with full thick veneers. It does have some quirks but lays very flat and is great to work with. The cost is similar to regular “AC” exterior plywood without all the ‘footballs’ and interior defects. Weight is similar to ‘Doug Fir’ and lighter than ‘Southern Yellow’. I am pretty sure it’s available across the US and abroad.
That’s a lot for the first get go. I will also send updates and pictures as I go along.

