PDRacer
For more info about the PDRacer boat and free
plans, see:
https://www.pdracer.com/
- For high performance Oz PDRacer plans, click
HERE.
Well, I promised Shorty that I would build one
of his PDRacers and join the fleet for some of the races to
be held in this area. I didn't think it would take too long
and besides it looked like fun. I just got a new set
of tools (on John Cupp's advice) which included a brad driver,
so I figured I would use that for really speedy construction
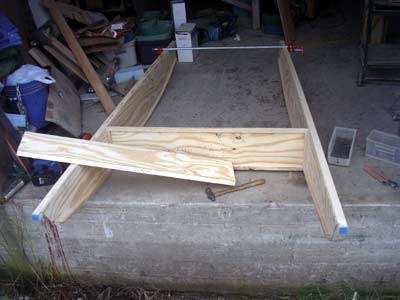
I decided to use Yellow Pine plywood for the boat
since it is a little tougher than Lauan. In the photo below,
I have marked out the rocker of the sides and have a batten
sprung to mark a fair curve.

I decided to use the PL Concrete Crack & Masonry
Sealant as I had heard Mike Goodwin recommend it, and it seemed
to be all the local HD had in stock.

Here, I use the Delta brad driver to attach the
chine log to the side. The tool worked great, but I did have
to use a drywall screw or two, especially at the ends.

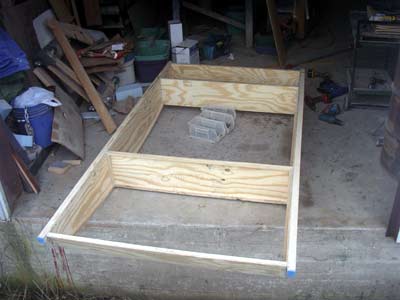
After the sides and the bulkheads were assembled,
I started sticking stuff together. I dry assembled each joint
first with drywall screws, then opened them up and caulked.
I started with the forward bulkhead....

...Then went on th the bow transom. Notice the
clamp holding the sides in position so that I could get it in
place. This job could have used a helper.
The PL does not set up too quickly, but I had
to get the bottom on before I left it in this stage:
To put the bottom on, I turned the side and bulkhead
assembly over and put a bead of PL on the transom...

...then I held the bottom down with my knee while
I put a couple of drywall screws through it into the transom.
That done, I propped the bow end of the bottom piece up so that
I could caulk the rest of the mating areas:

After everything was ready, I removed the prop
and let the bottom down to it's proper postion and got busy
with a few more screws and about a million brads. This was a
full sheet of ply and I went back later with the cordless saw
that came with the Delta Six-Pack and trimmed it off.
I chose to make a polytarp balanced lug for the
sail on this boat partly because I was familiar with it and
partly because I knew it would not require a very long mast
or spars. I glued up a 2-1/4" x 2-1/4" blank about
12 feet long for the mast out of some clear Southern Yellow
Pine I had lying around. That happens to be a piece of 2 by
and a piece of 1 by. It had a bit of a curve in it after the
glue had set up, so I tapered it by taking off the concave side
of the curve. This made it pretty straight.
In the next picture, I am marking for the champfer
which will make the stick eight sided:

Here I am using the Delta saw to cut one of the
corners off the mast blank. I should say that this set of tools
has proved to be quite useful. The quality is excellent and
the price reasonable. The other tool that I really like from
the set is the cordless sabre saw. With a good blade, this thing
really does cut - not on a par with a good corded model, but
it is so handy that I use it all the time.

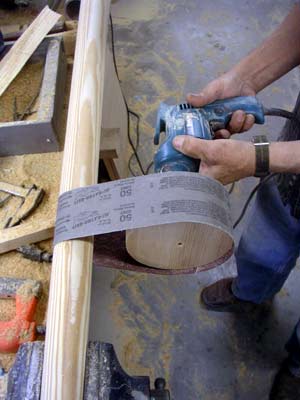
The main reason I wanted to make a round mast
was to try out a trick that I had heard about on a discussion
group: turning a sanding belt inside out and using a drill to
finish the rounding process. After I sawed the corners off,
I used a hand plane to approximate a round shape. After it was
about 32 sided or so, I cut a disk of wood about the size of
the mast, put a 3/8" bolt through it and chucked it in
the drill. It would only spin in the belt which sanded the disk
rather than the mast. I figured that I needed more friction
on the driver than the mast, so I made a larger disk and bingo!
It worked like a champ:
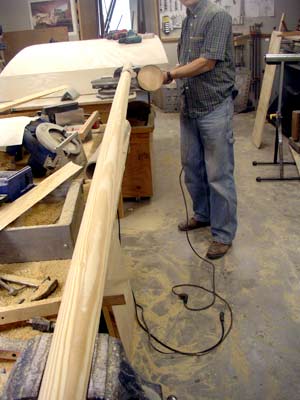
For this job, you need a drill with some guts.
A slow speed model is good too. I happen to have two work benches
in my shop, each with a 4" vise. I clamped the blank in
both of these for stability and ran up and down it with stops
to rotate. I found it quite easy to keep the belt centered on
the disk.
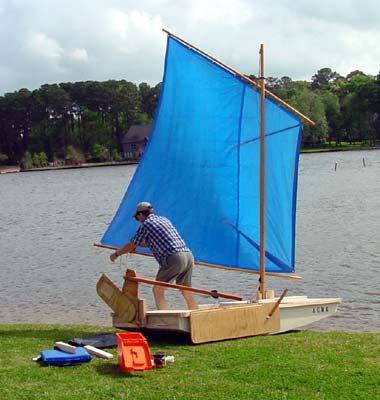
Shortly after finishing the boat, I went to Conroe
for my first race. In this picture, I am rigging things up.
You can see the darts in the sail - a-la Jim
Michalak - but I think they went a bit too far into the
center of the sail. I got some shape, but perhaps a bit much
for the conditions. It was quite blustery that day, gusting
in the 20's anyway, and I later broke my leeboard and capsized.
That whole miserable story is told by Shorty.
As you can imagine, the sailing was fun in those
conditions. I made my boat with less freeboard with the idea
of having better upwind performance than the others and beating
them all! In the weather that day, I just got wetter than the
rest - both by capsizing and from water coming over the sides,
bow and stern in the choppy water.

Oh well, there is another race this Saturday and
I have a brand new leeboard.......