Build Your Own Canoe
Excerpted from:
"How
to build your own boat from scratch"
by John Traister
The construction of a canoe is not easy. It is
a task that requires weeks of careful and tedious work even
for the professional. The amateur, therefore, should not attempt
building a canoe—at least not by standard methods—unless
he is a very painstaking workman and well experienced in the
use of woodworking tools. Yet an amateur can build a canoe if
he'll address his energies to the simple plywood canoe described
in this chapter!
Before getting into the construction details,
however, let's take a look at conventional canoes so that you
will have a better idea of what you're shooting for. There are
five distinct tvpes of canoes used in North America: the all
wood design; the canvas canoe; the almost-extinct birch bark
canoe; the aluminum canoe; and the fiberglass canoe. All other
types are hybrids. The authentic birch bark canoe is only built
by certain Indian tribes and by a limited number of non-Indian
builders who produce only a few each year. These canoes are
extremely hard to obtain and even harder to construct—just
like the canvas canoe.
To understand the procedures for building birch
bark or canvas canoes, let's briefly study the various steps.
This introduction will help you to appreciate the simplicity
of the plywood canoe described later.
The material for the ribs and lining is perhaps
the most critical consideration of the entire construction.
These members should be made from cedar, balsam, spruce, or
if these woods aren't available, from some other type of light
free-bending wood. This lumber should be split, shaved and planed
to a thickness of 1/4 to 3/8 inches and a width of 2 inches
for the average size canoe. Notice that we said "split."
If sawed, these members will not stand the bending
required later.
 Figure 9-1 Method of bending and
drying rigs for a conventional canoe
 |
Immediately after each rib is made, it should
be placed in water to prevent drying until the time when it
will be bent into its finished shape. After enough ribs have
been made, they should be placed in a steam box for a few minutes,
then removed and bent over a form as shown in Fig. 9-1. Two
forms will be required. The ribs will be air dried on the forms
for several weeks. Notice that the ribs placed first on the
forms (Fig. 9-1) will be of the proper size and shape for the
ends of the canoe, while those on the outside of the pack are
for the center. In using the ribs after they have dried, the
builder works each way from the center. Because this procedure
requires two ribs of the same size and shape, two forms will
be needed. In other words, the ribs bound on a single form as
in Fig. 9-1 are only enough for half of one canoe.

Figure 9-2 Two pieces of White Oak or
other tough wood should be shaped as shown here
While the ribs are drying, begin work on the
lining. The lining is made up of strips about 2 inches wide
and 1/8 inch thick for canoes up to 15 feet in length. Cedar
is usually the type of wood used. Again, it is best if these
strips are split, not sawed. Afterwards, they should be planed
to shape. The gunwales which come next should be made of tough
wood like white oak. They consist of two pieces and should be
shaped as shown m Fig. 9-2. It is best to split these from a
tree and shave them down to a 1" x 1" size to facilitate
bending them around the corners. For a 15-foot canoe the gunwales
should be cut 15 feet long, even though the curve (Fig. 9-2)
will shorten them somewhat. However, the vertical ends of the
canoe also curve and this will return the total length to 15
feet when the craft is completed. The gunwales should be steamed
and bent as shown in Fig. 9-3 and allowed to dry on a form.

Figure 9-3 Canoe gunwales steamed and
bent in this position and allowed to dry on a form.
Refer again to Fig. 9-2 and notice that four crossbars
(braces) are used fora 15-foot canoe. These should be mortised
into place as shown and fastened with a few small boat nails.
The two crossbars closer to the center of the craft should be
about 2' 8" long while the outer two—each placed
about 2 feet from the ends—should be about 17 inches long.
The strips used for the lining must be fastened
together at each end with cord and hung inside the canoe while
the ribs are installed. The ribs are then trimmed to the required
length, and sprung - starting at the center and working alternately
towards either end - under the gunwales. They should be spaced
about a half-inch apart. Once the ribs are in place, the lining
strips should be fitted together neatly and tacked to the ribs.
Before the end ribs are placed in position, however, a narrow
half round strip should be stretched and bent to the proper
shape and fitted in to cover the seam. A thin narrow strip of
wood should then be nailed to the top of the gunwales to protect
the edges of the birch bark or canvas body fabric.
If you want to try your hand at covering the
canoe with birch bark, it can be done, but good bark has become
so scarce that it's almost impossible to find. Check into this
before beginning. The Indian method was to sew up the bark with
split and boiled spruce or tamarack roots while the bark was
still fresh from the tree. Modern materials, however, will make
this phase of the construction go easier. Still, at best it's
slow work, and in olden times several squaws would work together
on the sewing, so that the job could be completed before the
bark became too brittle.
All of the bark—including that portion
attached to the gunwales—was sewn (not nailed) to the
framing and applied to the craft with the flesh side out. To
give the canoe the proper shape, two sets of stakes were driven
firmly into the ground and the ends of the canoe pinched between
the stakes. The ends rested on blocks of wood and the inside
was weighted with stones to give curve to the bottom. The seams
were then daubed with boiled spruce gum which
hardened immediately and made the canoe perfectly waterproof.
Length 14 feet
9 inches
Width 6 feet |
Figure 9-4 Shape of 12-ounce
double-filing
duck (canvas) prior to applying to Canoe
If you prefer to go with a more conventional
canvas covering over the cedar lining, obtain 12-ounce double-filling
duck in one piece and cut it to the shape shown in Fig. 9-4.
The canvas should be about 6 feet wide and - to allow for good
seams - about 8 inches longer than the canoe. Fasten the canvas
to the gunwales on the outside, and tack to the top edge with
very small flat headed tacks placed close together. Fasten the
ends first, then the center, and finally midway between. The
ends of the canvas should then be sewn up with the seams inside.
At no time during the construction of the craft
should the canvas be allowed to become wet or even damp and
possibly cause shrinkage. Furthermore, wet canvas often won't
stretch properly. After the dry canvas has been stretched into
place, you're ready for the final steps of oiling and paindng
the canoe. It is customary to administer liberal applications
of hot boiled linseed oil to the canvas. When the canvas has
dried thoroughly, paint it with any type of marine paint. Only
the canvas, however, should be painted; the bare wood should
be primed with a clear wood filler and varnish. Figure 9-5 show's
what the finished canoe should look like.

Figure 9-5 A finished canvas-covered canoe
The most primitive type of canoe is the wood
dugout which was recorded in ancient history. It is still used
today in some South American countries and in other parts of
the world. Dugout canoes were built by felling a suitable tree
and then chopping and burning it. With the trunk lying on the
ground, several workers would carry on the chopping and burning
procedure until one side of the trunk was slightly flattened.
Then they would hollow out the craft with more chopping and
burning. These very crude shaping procedures were just about
all that the fabrication consisted of.
Modem wood canoes are constructed of wood planking
or laminated sheets molded into shape in the way that fiberglass
and aluminum canoes are formed. The type of canoe described
later in this chapter for amateur building consists of a combination
of wood and fiberglass so that the construction can be accomplished
by the first-time boatbuilder.
Unlike the canoes described previously, this
design only requires one rib where the others need a dozen or
so. Moreover, the ribs don't have to be steamed and bent - they
are merely cut from plywood or whole lumber. In place of the
cedar skin so difficult to split and plane on classic canoe
designs, plywood is used; elsewhere on the craft, fiberglass
replaces canvas and birch bark. The result is a canoe that is
tough and scrape-proof. Better yet, you can build this canoe
in a tenth of the time it would take you to turn out a multi
ribbed conventional canoe.

Figure 9-6 Square-stern model designed
for use with outboard motor
This craft can be built with a square stern for
use with an outboard motor (Fig. 9-6), or as a double-ender
(Fig. 9-7) for paddling.

Figure 9-7 Drawings of square-stern
model and double-ender (click to enlarge)
Before beginning construction, obtain these Materials.
Start construction by mating a full size drawing
on heavy paper of the planking pattern (Fig. 9-8) that will
cover a quarter of the hull. Use a 1/4" x 3/8" batten
about 8 feet long to draw the curved sheer line and bow lines
tangent with the 12-inch radius. Cut out the pattern and place
it on a 4' x 8' sheet of 1/8-inch plywood as shown in Fig. 9-8.
A keel centerline drawn on the plywood will help to locate the
pattern. Draw around the pattern to lay out one side, then flip
the pattern over and lay out the other side. When cutting the
plywood, make a slit the width of the saw blade along the centerline,
stopping at a point 48 inches from the bow (as indicated in
Fig. 9-8).
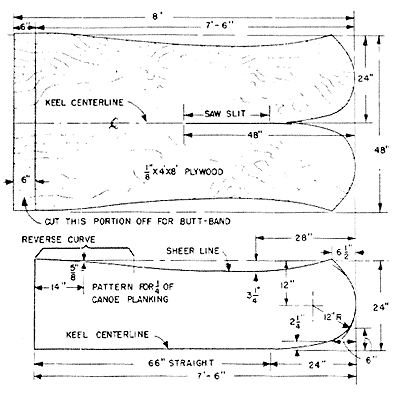
Figure 9-8 Planking pattern and layout
 Figures 9-9a, 9-9b, 9-9c (click
to enlarge)
 |
If you are going to build the double-ender paddling
canoe, lay out and cut another sheet of 1/8-inch plywood as
you did the first one. If the square-stern canoe for use with
an outboard motor is your choice, do not lay out or cut the
second sheet of 1/8-inch plywood. Set these sheets of plywood
aside until later and make full size patterns of the parts shown
in Figs. 9-9A, B and C. Note that some parts, such as the transom
and transom knees, are used only on the outboard-type canoe.
Omit these if you build the double-ender. Cut out the patterns
and transfer their shapes to plywood or lumber according to
the drawings. When fastening the transom frame pieces to the
3/8-inch plywood, coat the contacting surfaces with waterproof
glue and use 1-inch galvanized boat nails or 1-inch #6 flat
head screws arranged in a staggered double row spaced about
2 inches apart.
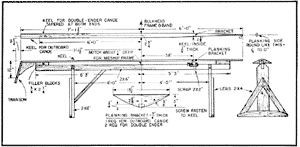
Figure 9-10 Building framing with dimensions
and layout for keel and other attaching members (click
to enlarge)
Next, cut the keel (Fig. 9-10) to size and shape.
Note that the double-ender keel is tapered at both ends and
is somewhat shorter than the keel of the outboard-type canoe.
Now. cut a 1/2-inch deep notch in the 3/4-inch plywood midship
frame (Fig. 9-11) for the keel. Since two 1/8" x 6"
plywood pieces—cut from scraps of plywood sheets used
for planking—will serve as butt bands to reinforce the
seam where fore and aft planking join, cut a notch 6 inches
wide and 1/4 inch deep in the keel so the butt band straddles
the midship frame (Fig. 9-11).
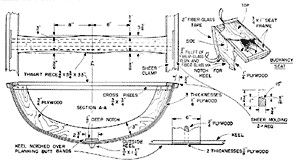
figure 9-11 Midship frame and transome
are kept in alignment with braces toe-nailed to floor and clamped
to frame parts. (click to enlarge)
To assemble the keel and butt bands to the midship
frame, first fasten keel to frame with glue and one I 1/2-inch
#8 flat head screw, making sure the frame is square with the
keel. Then coat the keel notch and edges of the midship frame
with glue and bend one of the 1/8-inch butt bands around the
frame (Fig. 9-11). fastening with 1-inch boat nails spaced 3
inches apart. Now coat the contacting surfaces of the first
and second butt bands and wrap the second band over the first,
fastening with 1-inch boat nails as before. Again check to make
sure the keel is square with frame and clamp the butt bands
to the keel on both sides of the frame until dry.
Next, make a building form consisting of a 2"
x 4" mounted at a convenient working height on top of legs
in the manner of a saw horse as in Figs. 9-10 and 9-12. Cut
one planking bracket (Fig. 9-10) if the outboard canoe is to
be built - two if the double - ender is your choice - and clamp
to a scrap piece of 2" x 2" stock mounted 38 inches
from the center line. Now place the keel and midship frame assembly
in position on the form; mark and cut a notch for the midship
frame in the 2" x 4" of the building form and clamp
in place.

Figure 9-12 Midship frame and transom
are kept in alignment with braces toe-nailed to floor and clamped
to frame parts.
The end of the midship frame can be supported
by erecting two 1" x 2" braces extending from the
floor to the frame ends as shown in Fig. 9-12. Toe nail these
supports to the floor and clamp them to the frame. The keel
is then lifted up slightly, and the notch in the planking bracket
is coated with glue and fastened with one 1-1/2-inch #8 flat
head screw. This procedure is followed for both the fore and
aft ends of the double-ended canoe. For the square-stern canoe,
notch the previously assembled transom to the keel and fasten
the transom and transom knee to the keel with glue and three
1-1/2-inch #8 flat head screws at each Joint. Be sure the transom
is laterally aligned square with the keel. Support is achieved
with 1" x 2" braces extending to the floor as was
done for the midship frame. The bottom surface of the keel is
then rounded off with a plane to insure good contact with the
plywood skin.
The 1/8-inch plywood skin is bent to shape after
it has been steamed or soaked in hot water. The latter process
is accomplished by laying rags, burlap, or old rugs on the plywood
and saturating the material with hot water. When the plywood
is pliable enough to bend, coat the keel, the forward 3 inches
of the butt band, and the contacting surfaces of the previously
cut plywood planking. Then place the plywood on the frame and
position the aft edge at the center of the butt band, thereby
making a 3-inch lap. Start shaping the plywood to the frame
by bending it around the butt band. Fasten the plywood to the
butt band with C-clamps at the sheer ends and bend the bow ends
down until the curved ends come together. Tie a rope around
the plywood at the bow to hold it in place temporarily.
Make certain the plywood is accurately centered
on the frame and then fasten to the butt band with a staggered
double row of 1-inch box nails spaced about 1-1/2 inches apart.
Clinch over the nails on the inside. Continue by pulling together
the slit-cut edges along the keel and fastening them to the
keel with 1-inch nails. Clamp the curved ends together with
small C-clamps and fasten with glue and 1-inch nails clinched
over. Wooden wedges driven under a steel band (from a packing
box) wrapped around the plywood and held together with a C-clamp
(Fig. 9-13) will keep the plywood in position until the glue
dries.

Figure 9-13 One sheet of 4' x 8' plywood
planks forward half of the canoe
The aft planking is installed just like the fore
planking on the double-ended model. For the square-stern model,
however, do not cut the 1/8-inch plywood; rather, soak (as described
previously) and wrap the plywood around the transom and butt
band. Fasten the plywood to the framing members with glue and
1-inch box nails.
Do not move the hull from the building form for
at least 12 hours after the plywood skin is installed - let
the glue dry thoroughly. After the glue has dried, remove the
clamps and lift the hull from the form. Place it right side
up on sawhorses. Fit the breasthook to the pointed end of the
canoe as in Fig. 9-7 and secure with glue and 1-inch nails.
The double-ender has a similar breasthook at the other end while
the outboard canoe design calls for two transom knees at the
stern (Figs. 9-14a and 9-14b). Coat the contacting surfaces
of the knees with glue and fasten to the transom with two 2-inch
#8 flat head screws, and attach to the planking at the sheer
line, using 1-inch boat
nails.

Figures 9-14a Details of transom stern
knees and breast hook. (click to enlarge)
Rip a 15-foot length of 3/4" x 1.3/4"
stock as shown in Fig. 9-11 for the sheer molding. Clamp in
place on the outside of the planking at the sheer line as in
Fig. 9-11 and mark the planking along the molding edges. Remove
the moldings. Coat the contacting surfaces with glue and reclamp
the moldings in place. Fasten the plywood to the moldings with
3/4-inch nails spaced 1 1/2 inches apart.
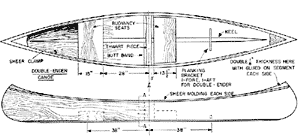
Figure 9-14b Plan and elevation views
of square-stern and double-ended models with required dimensions
Make two sheer clamps (Fig.
9-9C) and half lap the ends to fit the transom
knees. Notch the clamps to fit over the butt bands, coat all
contacting surfaces with glue, and fasten with 2-inch #8 flat
head screws spaced 6 inches apart. Then install the two 3/4"
x 3/4" crosspieces and the thwart piece across the top
of the midship frame as in Figs. 9-7
and 9-11.
Now turn the hull over, bottom side up. to Install
the outside keel. Saw 15° bevels on each side of the keel
as in Fig. 9-11 and make the length 13 feet 2 inches for the
outboard canoe and 12 feet for the double-ender canoe. Next,
taper the end of the keel down to nothing at the bow (Fig.
9-11). Taper both ends for the double-ender. Fasten
with glue and 1-1/2-inch #8 flat head screws spaced 6 inches
apart. Again turn the canoe right side up so that the buoyancy
seats (Fig 9-7)
can be installed. Make cardboard templates of the side pieces
shown in Fig. 9-9.
Locate the position of these side pieces from the midship frame
(Fig. 9-11) and
mark the inside of the hull. Since the templates are only an
approximation of their shape, fit, mark, and trim each template
individually so that it follows the inside contour of the hull.
If you cut too much off a template, discard it and make a new
one. A good fit is important because these buoyancy seats are
actually flotation chambers that will keep the canoe and occupants
afloat if capsizing occurs.
After fitting the templates, transfer their outline
to 1/4-inch plywood and saw to shape. Make up the 3/4"
x 1" seat frame and fasten the sides to the frame with
glue and nails. Use fiberglass resin to coat the areas inside
the hull that will be in contact with the seat sides and frame.
Then, before the resin dries, place the seat in the hull. Next
fasten with three nails driven through the planking into the
seat frame on each side. To make a watertight seam where the
seat sides meet the hull, make up a heavy paste-like mixture
of fiberglass resin and ground glass fibers, and apply a 3/8-inch
fillet of the mixture as in Fig.
9-11. Then glue and nail the 1/4-inch plywood top
in place and seal all corners and seams with 2-inch fiberglass
tape and three coats of fiberglass resin.
Covering the outside of the hull is your next
step. First turn) the canoe upside down on two sawhorses and
prop it up so that one side of the canoe, from sheer to keel,
lies as flat as possible. If you are using 50-inch wide fiberglass
cloth, cut the cloth down the middle to obtain two 25-inch wide
pieces.
Mix about one quart of fiberglass resin and apply
the substance to the entire side of the canoe, including the
outside keel. If uneven absorption leaves dull areas or spots,
touch up these with another coat of resin. Now place fiberglass
cloth on the hull side so that one long edge is against the
bottom of the sheer molding. Mix another quart of resin and
apply to the fiberglass cloth, starting along the sheer clamp
and working toward the keel, bow and stem. Keep stretching and
pressing the cloth gently to remove any wrinkles as you saturate
it with the resin. Do not mix more than a quart of the resin
at a time because it sets up rather quickly and soon becomes
unmanageable. Also have a pan of warm water with household detergent
or soap handy to remove the resin from your hands.
When you reach the keel, wrap the cloth over it
and trim off the excess cloth. Wrap the cloth around the bow
and stem too. Then turn the hull over and apply fiberglass cloth
to the other side, again overlapping the keel, bow and stern.
Apply three coats of resin and allow each coat to harden before
applying the next one. After the last coat has hardened, remove
high spots with a disc sander and smooth the surface with fine
sand paper.
For color, a pigment can be mixed into the last
coat of resin if desired. For those of you who wish to paint
your canoe, use two thinned coats of Dolphinite #9585 undercoat
on the outside, followed with two thinned coats of deck and
ship paint #9007. The inside of the hull will look good with
two coats of Dolphinite #9400 rowboat paint. Molding and cross
bars should be varnished bright.
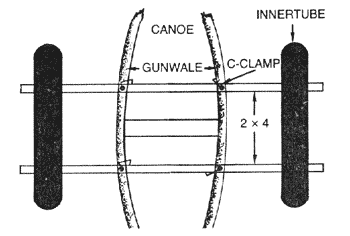
Figure 9-15 Method of improvising canoe
outrigger with 2" x 4" lumber, C-clamps and two innertubes
Any round bottom canoe with a small, flat shoe
keel is ideal for stream and river travel but it does demand
some balancing skill. For family canoeing, one or two outriggers
will increase safety and are simply attached. An outrigger can
easily be improvised with two lengths of 2" x 4" lumber,
two innertubes, and four C-clamps. Cut the 2 x 4's into 6-foot
lengths; center them across the canoe and clamp to the gunwales.
Then stretch an innertube over each end of the 2 x 4's as shown
in Fig. 9-15. A pair of simple outriggers like these will make
any canoe as stable as a flat bottom john boat.

Figures 9-16-a,b,c,d&e Details for
constructing outrigger and pontoon for canoes, kayaks, and rowboats
A single outrigger designed especially for the
canoe described in this chapter can be built in a couple of
hours. While this type is not any safer than the improvised,
innertube types, it is somewhat more attractive and you may
want to build one.
Figure 9-16 shows how to begin construction of
the outrigger by laying out one of the sides on a piece of 1/8-inch
plywood. You can obtain the required curve by springing a wooden
batten (1/4" x 1/2" x 6") around the dimensions
in the drawing. After sawing the first side to shape, use it
as a pattern for the second side to insure that both sides are
exactly the same.
To determine the exact size of the center piece,
make a full size drawing of section A-A in Fig.
9-16 on heavy paper. Transfer the outline of the
center piece to 3/4-inch stock and cut to shape. Now, lay out
the top (Fig. 9-16) by using a batten sprung against measured
points as you did for the sides; then saw to shape.
To aid in assembling the pontoon, make a holder
(Fig. 9-16a) from scrap material. When finished, place the two
sides in the V-shaped cutouts of the base and insert the center
piece between them. Then with a flat file held between the edges
of the pontoon sides that are to be joined, file a slight bevel
on the edges as in the enlarged detail of section A-A in Fig.
9-16. Since the top piece fits inside the pontoon side pieces,
the edges of the top will have to be beveled. To do this, temporarily
clamp the edges of the sides together, place the pontoon top
piece in position and mark for beveling. Plane and fit the top
piece so that the beveled edges will make wood-to-wood contact
with the sides.
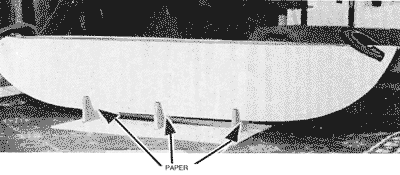
Figure 9-17 Place pieces of paper between
hull ans holder at bottom of V-blocks to prevent hull from becoming
glued to holder.
Start assembling by fastening the center piece
to the center of the underside of the top with four 1-1/2-inch
#8 flat head screws. Coat all joining surfaces of the sides,
center piece, and top with a thick mixture of waterproof glue
and fasten the sides to the top with 1-1/4-inch galvanized shingle
nails spaced about 2 inches apart. Then clamp the edges of the
sides together (Fig. 9-17) and fasten with 1-inch box nails
driven through both sides as in Fig. 9-16. Clip off the projecting
ends of the nails to within 1/8 inch of the sides and clinch
by holding an iron on the nailhead side and bend by pounding
over the nail on the other side. After the glue dries, trim
all edges evenly and sand smooth, taking care to round the edges
of all corners.
Make the pontoon outrigger, upright, and support
(Figs. 9-16B and 9-16C) and fasten to the pontoon with glue
and 2-inch #8 flat head screws. Reinforce with 3/4-inch triangular
glue blocks glued and nailed to the support, upright, and pontoon
top as in Fig. 9-16D.
To make the pontoon watertight, first cover the
entire pontoon with one coat of fiberglass resin and then apply
2-inch wide fiberglass tape to all pontoon seams and saturate
the tape with resin. After the resin has hardened, sand smooth
and finish with two coats of enamel undercoater followed with
two coats of marine enamel of the desired color. After the outrigger
has been painted, fasten it to the canoe with two 1/4-inch bolts
bent to a J-shape as shown in Fig.
9-16E.
Click HERE
for materials list for outrigger and Pontoon


